Wednesday, November 30, 2011

Color Throwdown Challenge #170

Welcome back to another week of COLOR, with the amazingly talented Color Throwdown team!  If you haven't been keeping up, we have several new superstars on our team.  They each have been taking their turn hosting during these last few weeks of challenges this year.  This week our hostess with the mostess is Lynn.  Check out her awesome palette:
I was so happy when I viewed her color choice, because I've actually designed a pack of paper with this palette.  So, I wouldn't need to recolor a different pack in order to play along :0]  Yay!  I used my Cheerful Chirps pack and made it fit a holiday card without modifying anything.  LOL  I think it lends a rustic charm to my CAS card.  I incorporated one of the birds from A Little Birdie cut file, the Frame Me cut file, and the Border Builders Scallop Dot cut file.  My card was cut using the Spellbinders Large Circle and Scalloped Circle dies. 

My layout was inspired by the fun Mojo Monday sketch (MOJO217):
I turned the sketch to accomodate my digital Beautiful Baubles sentiment.  The little bloom on the bird is from a mini punch I've had forever, and the button is from my stash.  That's about it.  One more holiday card down, and several to go! 
Be sure to check out our amazingly talented CTD team and their wonderful works of art :0]
Wanda
Lydia Fielder ~ November Guest Designer

Thanks for stopping by this week.  Hope you had a great Thanksgiving with your loved ones ♥

Wednesday, November 23, 2011

Color Throwdown #169

Hi friends.  I'm here to share my Color Throwdown card for the challenge  (CTD169) our very sweet and talented, Lori is hosting.  Check out her fun palette:
If you know anything about me, you know I love dimension on my cards and I love using digi paper.  This card is no exception...it's more like a perfect example of what I love to do.  Sometimes I feel like I'm cheating by simply recoloring my paper to fit a challenge, but doesn't that make perfect sense?  Why struggle to find the colors you're looking for?  RECOLOR and print.  Easy...  For my card, I recolored two sheets in my Brisk Breeze pack. 
My dimension is portrayed through my Perfect Poinsettia cut file.  I scaled my file by 50% and eliminated the bottom layer.  After I cut my pieces, I ran them through a crimper at different angles repeatedly to soften the cs.  I then formed the leaves with my finger and thumb and gave each one a slight pinch at the tip.  I adhered matching layers with a glue dot, and single layers with dimensional tape...just to give it a little more pop.  My sentiment is from Secret Santa and it's stamped on Laura Pryor's Lil' Inker Designs Flag die (THANK YOU LAURA!!!).  My scalloped border was cut with my new MS punch.

My layout was inspired by Chupa's Sketchbook Saturday Challenge #38:
That's all I have to share today, but be sure to check out the rest of our amazingly talented DT:
Wanda
Lydia Fielder ~ November Guest Designer

Thanks for stopping by today.  Hope you have a wonderful Thanksgiving this week and a LOOONNNNG weekend ;]

Monday, November 21, 2011

Sweet Season's Greetings

I have been itching to use my new supplies from the very talented Laura Pryor's newest Lil' Inker Designs release!  I finally finished my card today, so I thought I would share.  When I first saw this ca-ute lil' tree, it just begged to become 3-D.  I found later that my idea was far from original :[  This lil' tree has become 3-D at the hands of some very talented designers...BUT, I still went with my initial idea!

To create my 3-D tree, I cut 7 trees using the Holly Jolly Dies.  I scored 6 of the trees down the center and folded them in half.  I adhered each half to the next, one half at a time (does that make sense?!).  After I adhered my 6 folded trees, I adhered the 3-D tree to the remaining die cut tree (to give it a flat base).  I created my "frame" by tracing the die cut tree with my SU tool (can't remember the name of it and I can't find it in the catalog) and cutting with my exacto knife.
I stamped my sentiment from the Holly Jolly stamp set, using VersaMark and dark brown embossing powder.  I must say that I am in love with Laura's stamps!  They are the highest quality acrylic on the market and produce a crystal clear image every time.  I was so pleased when I embossed this sentiment...nothing got muddled like some of my other stamps do.  Here's a closeup to show you how clean the sentiment is:
For my border, I used my new Recollections punch, some pretty lace ribbon, and my multi color earthy twine.  I tied my button down with the twine after adhering my ribbon and decorative border, and added my pearl tree topper (by cutting the prongs off the back and adhering with a glue dot).  I then popped up my frame layer with 1/4" foam tape, to give a lot of dimension around my tree that I adhered directly to the base of my card.

My tree trunk is actually three die cuts popped up with 1/16" foam tape.  You can kind of see it in this photo:
That's really all there was to it!  I love dimensional cards anyway, but this one just makes me smile :]  Probably one of my favorite Christmas cards made to date ♥  I have a ton of ideas for this lil' tree, hopefully I'll have time to bring them to life.
Thanks for stopping by today.  Hope you are having an amazing week!

Wednesday, November 16, 2011

Color Throwdown Challenge #168

Today one of our newest Color Throwdown members, the very sweet and talented, Keva is our hostess.  She chose a unique palette that I think you'll adore.  Check it out:
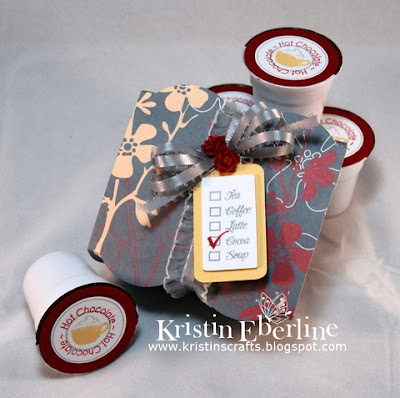
I love this combination together!  I decided to recolor my own paper (as usual) and make a little package for a friend filled with hot chocolate K-Cups.  My friend recently bought a Keurig, and she has helped me out in a pinch several times at work, so I thought a little treat would be a nice way to say thank you :0]  The paper I recolored is from my Cherry On Top collection.  I used the MTME Oh-K Dokey cut file to create my package.  It went together in less than a minute, seriously.  SUCH an easy cover to whip up, I could make 100 pretty much in the time it takes to cut them out on the Cricut! 
I kept my package relatively simple to show off the pretty paper.  I wrapped it with my favorite white sewing trim and used some girly grey/silver ribbon to tie off my sentiment panel and show off my new resin roses.  I picked up the roses at Michaels, but I swear I'm going to buy some molds and make my own one of these days ;]  The tag I used is one of my newer cut files, Simple Tags Rectangle.  I stamped my drink choices, check boxes and check mark using the Fancy A Cuppa stamp set.
For the top of my K-Cups, I stamped the Fancy A Cuppa? Add-On hot chocolate sentiment and cut it out using one of my punches (which was obviously a little too small since it chopped one of the outer circles off).  I cut the outer, red circle using a nestie...also too small.  Apparently I don't have a 1 1/2" circle punch or nestie so please just ignore the outer edge of the K-Cup that's showing.  I need to update my punches/die collection :0] 
That's pretty much all there was to it!  If you know someone who has a Keurig, this cut file is for you.  It's so simple and only costs $2.50!!  Can't beat that!


Be sure to check out the rest of the DT for added inspiration with this week's colors:
Wanda
Lydia Fielder ~ November Guest Designer


Thanks for stopping by today!  Hope the rest of your week is awesome :0] 

Wednesday, November 9, 2011

So Thankful...Color Throwdown #167

Hi everyone.  I'm here to share my Color Throwdown card for the challenge Joan is hosting (CTD167).  She chose an awesome, vibrant palette this week:
I celebrated my birthday last week while I was in San Antonio for work...and I was lucky enough to have a very good friend who just so happened to be there at the same time.  He and I and some fellow, FUN co-workers, went to dinner.  We enjoyed some amazing steak and margaritas at a fab restaurant, and my friend was soooo sweet, he picked up the tab for my dinner!  Totally unnecessary and I argued with him, but he just would not let me pay on my birthday :]  I really appreciate his thoughtfulness...and I really don't feel deserving, but I'm SO THANKFUL to have such a great friend. I owe him so much more than a simple thank you card, and hopefully I can find a way to return the kind gesture.

As you can see, I kept my card very simple, and tried VERY hard to make this palette masculine!  The easiest way for me to do that was to recolor some of my plaid paper from last year around this time.  This sheet came from the Candy Shoppe collection.  I also started two other cards using two other recolored sheets from the same collection.  I hope to share those this week...I simply didn't have it in me to finish three tonight.  I got home pretty late and I'm feeling under the weather.  So...keep an eye out...I may be back tomorrow ;]  My leaves are from the Old Oak Leaf and Marvelous Maple Leaf cut files, the green tartan pattern was recolored from the Fresh Fabric Collection 2, and my sentiment came from my Sentimental Occasions stamp set.  The card was cut on my Cricut using the Creative Cards/Envelope 1 cut file. The button and twine are from my stash and I used a SU punch to cut out the word "thank".  I also sponged the edges of the green patterned paper with white acrylic paint.

That's all I have for you today, but swing by our very talented DTs' blogs for a great sampling of inspiring projects!
Wanda
Lydia Fielder ~ November Guest Designer

Thanks for stopping by today!  Hope you're hitting mid-week on a great note!!

Wednesday, November 2, 2011

Color Throwdown Challenge #166 & MTME Release

Happy Wednesday, my friends.  Welcome back to another edition of the Color Throwdown ;]  Today, Danielle is our talented hostess, and she chose this awesome palette:
Beautiful, huh?  LOVE the cool colors together.  I kept my card CAS for the most part and focused on some fun digi paper (FREE 12 Days of Snowflakes, Fresh Cut Expressions Collection 1, and Trendy Forest) and some super cute cut files.  The sentiment is stamped on a Tag You're It cut file and the other, more prominent cut file was released yesterday at My Time Made Easy.  It's the bell in the spotlight called, Ring in the New Year.  Isn't it adorable?  I scaled it 50% and then another 25%...so it's pretty big in the original form...but thankfully for cut files we can have any size we want!  Check out the MTME store to peek at all of the new products! They're sure to inspire you for the holidays.

My layout was inspired by the MOJO Monday sketch (MOJO213):
You can also check out the MTME Gallery and DT for even more inspiration ;]  Be sure to swing by the Color Throwdown DT for some amazing inspiration on the fresh palette Danielle chose:

Welp, I need to get going for now.  Thanks for stopping by today!  Hope you found a little inspiration to get crafty this week :]

Tuesday, November 1, 2011


Hi friends!  I’m popping in to share a project I made for the My Time Made Easy November release.  Lauren and Sara came up with a great collection of templates, images, cut files, paper and stamps this month!  This release is chock full of fun, versatile products that you can use for the holidays or throughout the year.  I chose to go with a holiday theme when I saw the Tri-It template.  It immediately reminded me of some gold colored “cones” I hang on my Christmas tree.  My entire tree is decorated in white and gold ornaments – no exceptions.  So, I thought it would be fun to recreate the gold cone and put my own twist on it.  I kept it simple and pretty…just like my tree :] 

I scaled the template to 50% before cutting and then stamped my pieces with Fanciful Flourishes using VersaMark and embossed in gold.

I created my handle simply by trimming about a 6”x1/4” strip of paper and wrapping the metallic ribbon around it until it was covered.  Neat, huh? 

I trimmed the extra “closure” strips off of the base (that ended up being my top), lined the edge with gold/white ribbon and a couple of pretty bows, and cut a tiny hole in the point.  Here I threaded a gold bell with some metallic ribbon and tied a small knot inside the cone to hold it in place.  I then tied a small bow above the bell (can we ever really have too many bows?!  I think not). 
Now if you’re wondering what this “ornament” would be used for on my tree…think goodies, like chocolate or a tiny present.  Either will look adorable with the white marabou lining the interior.  I love how it gives my ornament an ethereal look…because that’s the look I’m going for on my tree :]
Okay, that’s all I have for you today, but check back tomorrow – I have a quick and easy card to share for the release.  Remember, everything is live in the store NOW, so go fill your shopping carts!!  Take a gander at the rest of our talented DT for some more inspiration!  They never fail to amaze ♥


Thanks for stopping by today.  Hope the rest of your week is spectacular!!