Thursday, March 31, 2011

Color Throwdown Challenge #135

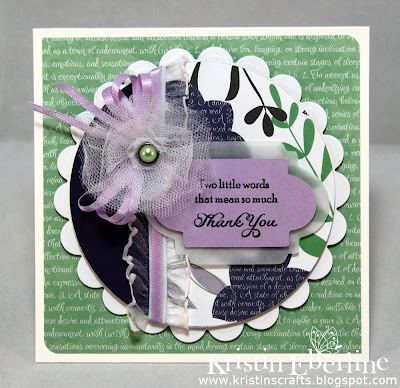
Hi friends.  I'm so excited to share my card with you today.  Yes, it is my day-late Color Throwdown card, BUT, since today is the first day of peeks for the MTME April release, I can use my card to share my new products!!  I am so excited to share my first full stamp sets with you this month!  Lauren is releasing two - Occasional Labels and Sentimental Occasions.  I used both on my card today :]  My palette is from the amazingly talented, Bar Anders who is our hostess at the Color Throwdown this week.  Check it out:
I used my new MTME paper for my card, but recolored it to match the CTD palette.  Isn't it pretty?!  I'm half tempted to add it to the release lineup, but we're short on time to do that :[  I decided to show a very simple use of the label cut file along with a sentiment.  Sentimental Occasions is a build-a-sentiment set that is timeless.  I foresee this becoming my go-to set for years to come.  The sentiments are much larger than most of our MTME sentiments, so they're easy to use as a focal point or separate on your project to draw the eye to different areas.  I chose to combine my sentiment on one oval, and layer it on my All Tied Up! Oval cut file.  Doesn't it fit lovely on the larger Occasional Label?  I was giddy about that little find :]  My larger label was cut from some Romance striped paper that complements my new pack (to be released on 1 April).  I have a special fondness for circular cards...I think they're so pretty, and I don't make them nearly enough, so I decided to create one for the first day of the April MTME release.  Everything else is pretty self explanatory, so I'll wrap it up and spare you further details!  LOL 

Be sure to check out the rest of our fab DT and the beauties they whipped up, both at the Color Throwdown:

...and at My Time Made Easy:
Amy Sheffer ~ April Guest Designer ♥

Thanks for stopping by today!  I hope you enjoy this release and my new sets!!  I can't wait to share more with you :]

Saturday, March 26, 2011

Just Us Girls {3-D/TEMPLATE} Challenge #77

Happy Saturday morning, friends!  I'm back with another edition of Just Us Girls challenging YOU to create!  Today, the oh-so-sweet-and-ultra-talented, Dana, is our hostess.  Leave it to that girl to show us a way to make a new, beautiful flower.  Today's challenge is to make a zipper flower for your project!  I gotta tell you, I'm STILL addicted to the burnt edged flowers that Dana challenged us to do, and I use those beauties everytime I need a pretty focal point.  I think these new zipper flowers might rank right up there with the burnt edged blooms though!  I bought several zippers, so I'm all set for a while :] 
So I decided I would share what I like to call a series of unfortunate events that I encountered yesterday in preparing and actually creating my card.  First off...I had no zippers and I couldn't think of any discarded clothing items that might have an old one I could salvage (plus, I had my color scheme all planned out...I needed choices, people).  So, before lunch, I ran downstairs to Target (yes, it's in our building at work) to see if they had any.  Nada.  Ran home at lunch to tend to my pup, but popped into Michaels first to grab a zipper.  No dice.  Finished my work day and decided to run to JoAnn's...but at one of the first stop lights, I decided to take a right and check out AC Moore instead since it's closer.  Of course they don't stock zippers!  So, back on my trek to JoAnn's...where I found the mecca for zipper sales!  Woot woot!  Mind you, it's almost 6 at this point and my card isn't even started.  I finally get home after 6, make dinner, take care of my pups, and eventually get started on my card. 
Looking at my card, it seems simple enough, right?  Just a little extra effort to put the pretty bloom together, but other than that, pretty basic.  Yeah, I thought so too.  My sentiment and the cut file it is layered on are an early sneak peek at the MTME April release where yours truly is the designer of the stamps and the label cut file :]  I cut the pieces on my Cricut, stamped my sentiment and embossed the label.  I set those aside while I sat downstairs and assembled my flower and my card.  I was ALMOST finished getting everything ready to adhere, only to drip a HUGE glob of water on my sentiment and label!  AARGH!  So...well after 11, I had to go back upstairs, recut my files, stamp, sponge, and emboss, before I could try to finish up.  I did that and assembled the rest of my card.  FINALLY!  I was finished...ready to photograph.  Or so I thought.  I picked up my finished card and opened it.  This is what it looked like:
So, easy enough fix...just completely unnecessary.  I cut the card in half and adhered the front panel to another piece of cs.  Ugh.  This all might not seem like a lot of "unfortunate events", but trust me, it was.  I didn't even touch on the zipper flower and how I butchered that! 

Let me start by saying that Dana has a wonderful, easy to follow tutorial on Want 2 Scrap.  I stitched my zipper as Dana recommended, using white thread.  She recommends using Fabri-Tac and not hot glue to adhere the flower coils.  Unfortunately, I didn't read her tutorial until I started making my card.  So, not only did I have to call my sweet friend Lisa while I was at JoAnne's to figure out what length of zipper to buy, I didn't know I needed to pick up some Fabri-Tac.  No worries though, I'm a big hot glue fan, so I figured I would just use that and be careful not to burn myself like I normally do.  I was successful in not putting a blister on my finger this time, but boy did I overload the glue!  It is EVERYWHERE!  Oh, and I couldn't figure out how to adhere it with the glue without some sort of base, so I punched a circle and adhered it to that :[  That's why mine is sort of flat.  Either way, once the flower resembled a bloom and was glued together, I admired my craftsmanship.  NOT.  I could see white thread all over that flower and glue was at every turn!  UGH.  No way was I starting this one over.  I pulled out my Cardinal (R59) copic and colored the thread AND the glue!  LOL  Hope you can't really tell in the photo!!  Ha ha

Anyway, that was my crazy night.  All for the love of a pretty bloom!  I do love this technique and the resulting flower, so I definitely will be using it again and hopefully perfecting my application of the technique :o]  Some of the other goodies you see on my card are the Beautiful Beech Leaf cut fileBorder Builders Elegance Scallop cut file, my Fluttering-by text paper, my Cherry On Top paper recolored to match the palette of our very first My Time Made Easy Pretty Palette Color challenge (MTMEPPC01) that Lisa is heading up. 
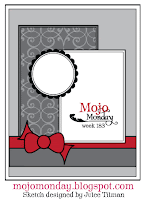
My layout was inspired by the Mojo Monday sketch (MOJO183).
So, with all that craziness, I hope you find it MUCH easier to whip up a pretty bloom and play along with us this week!  Can't wait to see the beauties you all come up with :O)  Be sure to swing by our fab DT's blogs for a lot more inspiration.  Don't forget to visit Alyssa Scritchfield, our very talented guest designer this month!  This is her last challenge with us :[  So sad to see her go...but I hope she'll still be a regular with us!
That's all I have for you today.  Thanks so much for stopping by!  Hope you have a fantastic weekend :]

Wednesday, March 23, 2011

Color Throwdown Challenge #134

**Edited to update photos, add the DT list and credit Lil' Inker Designs, 3.23.11**
Hi all :]  I'm sitting in a hotel room in Pennsylvania typing my CTD post.  My daughter and I drove up for a Penn State tour tomorrow :]  I finished up my card this morning and planned on bringing it with me and just photographing it here, BUT, I forgot it!  So, I asked my dog sitter (i.e. my daughter's friend) to photograph it and send it to me!  She totally came through, but since she used a cell phone the quality is a little grainy.  I promise to swap the photo out tomorrow night, though!  Danielle is our hostess today and she selected a really pretty palette:
Her inspiration came from the Cafe Mediterranean dp pack by DCWV.  Purple Onion Designs is sponsoring us this week.  They have a TON of awesome stamps to choose from!  If you haven't checked them out yet, do yourself a favor :]  I worked with 'Early 1900's Music Background' stamp and 'a little bird' set. 
I recolored my MTME Blue Skies pack and a sheet of Get Graphic to match the CTD palette.  My layout was inspired by the Sweet Sunday Sketch challenge (SSSC109).
Here's a closeup of the details...though they're a little rough around the edges :]  Flowers are by Prima, ribbon is from Pixie Petals of Etsy, and pearls are Recollections.  I used the new MTME Cornice Trimmed Rectangle for my white panel and the Border Builders Elegance cut file for my scalloped layer under the music notes.  My sentiment is stamped on a piece of vellum cut with the Sentiment Flag Die by Lil' Inker Designs :]
Oh, and a quick shot of the sentiment I chose for the inside...plain and simple...exactly how I wanted it :]
That's really all I have to share today, but be sure to check out the gorgeous creations our DT whipped up!  They are stunning!
Thanks for stopping by :]  Hope you are having a fantastic week!

Sunday, March 20, 2011

Just Us Girls PMS Made Easy :]

Yes...my title has meaning - I swear!  Oh, but FIRST, I have to share.  My vet called today to give me the results of the Histopathologist's report for my sweet pup.  Her tumors are NOT malignant!  YAY!  This is seriously the best news I've gotten all year.  Praise God!  SO, no chemo or radiation, just need to keep an eye on her ♥

Okay, back to my title.  Just Us Girls are being sponsored by Paper Makeup Stamps this week!  One lucky participant could win a $20 gift certificate to PMS!!  Lisa is our sweet hostess and she challenged us with a pretty color palette:
Nice, eh?  So, here's where I fess up.  I started my card on Friday and worked to get everything assembled, yet not adhered before exhaustion just took over.  I woke up Saturday morning and finished her up, ONLY to realize I was a do-do bird and forgot to use my PMS stamps!  So silly of me...we chatted about PMS all week and it still slipped my mind.  Duh.  So, I went to work using one of my favorite PMS digital sets, Sailing By.  I decided to showcase the versatility of digital stamps with a rather simple project.  I first colored my sailboat using a free, open source image editing program called Gimp.  I then inserted my image into Word and resized it to almost fill a full page.  I printed it on iron on image transfer paper, and cut it out.  I then ironed it onto a sack I created from some flour sack dish towels I picked up at Target.  I simply folded it in half, stitched two sides, and turned it inside out.  I stuffed it with a pillow pet for my photo and tied it off with some SU ribbon and May Arts Jute twine. 
My original intent was to print the sentiment and anchor on my shrinky dink paper, but I found that I don't have printable shrinky dinks :[  Boo.  So, I went without the sentiment and ancor, because I wanted them to be sturdy and water resistant.  You could fill this bag with a ton of things though, and give it away as a gift:  diapers, beach towels, clothes, stuffed animals...the sky is the limit!  I also thought that if I sent this to a little guy, he could use it as a linen bag on away trips from home, or just to store toys or a pillos and blankie in.  Lots of options...I just wanted to share the iron on ability :]  OH, and the iron ons DO wash without a problem!  I ironed an awareness ribbon on a tee shirt of mine and I've washed and dried it several times without any fading or cracking.  That being said, if you want to explore the possibilities with digital stamps and using them on fabric, these iron ons are totally worth it!   You may have noticed that I failed to use pink on my project.  I planned on sponging it on my sentiment, BUT, since my shrinky dink fell through, I thought I'd just share the card I originally made for the challenge before realizing I forgot we had a sponsor!  LOL 
My layout was inspired by the very first MTME Pretty Patterns sketch challenge (MTMEPPS01)!  Tangii is heading up this sketch challenge and they're looking for DT members, so be sure to play along and indicate your interest over on the MTME blog if you want to be on the team!!  If you don't want to be on the team, that's fine too...we just hope to inspire you to get creative each Thursday :] 
I recolored a sheet of my MTME Basic Blooms paper and added some School Plaid and Picket Fence paper.  My sentiment is stamped over a subdued nest and eggs from the Singing Silhouette set.  Let's pretend that nest is stamped in a subdued So Saffron instead of Crumbcake, okay?  ;)  LOL 
I used the rest of the palette along with a Rosey Posey Rosette cut from a piece of Wistful Wonder paper.  I embossed the frame I created from the Cornice Trimmed Square cut file and popped it up with dimensionals so that I could nest my rosette in the middle.  I think the rest is pretty apparent, so I'll spare you the additional details :]
Okay, so hop over to JUGS and check out the gorgeous creations our DT came up with! 

Then hop over to MTME to see what our Pretty Patterns sketch team came up with!

Thanks for not giving up on me (again) and stopping by :]  Hope you are having a wonderful weekend!!

Thursday, March 17, 2011

Color Throwdown Challenge #133

Hi friends!  I'm FINALLY posting my card for the Color Throwdown challenge (CTD133) that I'M hosting!  Eek...yes, the hostess without the mostess :|  I've had a tiring week for many reasons, but most prominent being my sweet little Shih Tzu, Pua, who had surgery on Tuesday.  She actually had three surgeries in one, but the primary reason for going under the scalpal was to remove three mammary tumors.  So sad to think my spunky little monkey has cancer :[  The tumors have been sent off to the Histopathologist to determine whether they are benign or malignant.  I've said many prayers every step of the way, and the current prayer is for benign tumors.  I don't want my sweet little gal to go through chemo or radiation...she's been through so much already, hopefully she'll get a break with the results ♥  Sorry for the long intro about my pup, she's just weighing heavily on my mind.  Okay, onto my card deets and the crazy, fresh palette I chose:
My paper is a very early sneak peek at one of the packs I'll release on 1 April at MTME :]  I used the MTME Tag You're It cut file for my vellum and plum layer, and my sentiment is from MTME Sensational Sentiments.  I made a shabby, tulle flower that I cut several layers using the Blossom Nestie and curled with my heat gun...added some sewing trim and ribbon, and popped every layer up with dimensional tape (I think I use more dimensional than any sane crafter ;) 
My layout was inspired by the very fun sketch over at Sweet Sunday Sketch (SSSC108).
That's all I have for you today.  If you haven't already hopped along to the DT's blogs, be sure to check out their gorgeous creations :]

Hope to see you back here on Saturday for a fab JUGS challenge!

Saturday, March 12, 2011

Just Us Girls {Technique} Challenge #75

Hi friends.  I'm finally here to share my Just Us Girls challenge (JUGS75) card!  I'm a little late :|  This was a tough week for me for several reasons, and I couldn't wait to get home on Friday to get crafty.  When the time finally came, I just didn't have it in me to finish, so I set it aside and spent time with my daughter instead :]  She'll be off to college before I know it so I need to sit back and cherish these moments while I can ♥  I woke up this morning, renewed and refreshed, so I went to work.  This week is a technique challenge hosted by Maria...and it's a technique I have never tried - Acrylic Smash.
I created my card around a couple of my new paper packs that I released this month: Wistful Wonder and Wistful Musical Magic.  I stamped my MTME Singing Silhouette image on a write-on transparency panel with black Staz-On...as you can see, it did not cooperate with me.  I really need to find some textured acetate or at least sand my panel slightly before stamping it.  Not sure why I didn't this time.  I flipped the acetate and used a foam brush to swipe on pink and olive acrylic paint.  Make sure you add a lot of paint so that it's still wet when you press it to your cs to dry.  My paint was too thin at first and I had to add more paint to make it adhere well.  I added SU Pink Pirouette ribbon and SU Rose grossgrain to my image and adhered the panel to a Cornice Trimmed Square cut file that I stretched just slightly to create a rectangle.  I hot glued some primas and my triple looped bow and a little nest I created. 
I got the idea for my nest from one that Amy Sheffer made.  It's actually a hybrid of what Amy did HERE and what Broni did with her gorgeous bloom HERE.  I punched a circle and trimmed a small wedge from it, then overlapped and adhered the straight edges to each other to create a shallow cone.  I then took some SU Twill Tape (thinnest style), twisted and adhered it as I wrapped it...starting from the center and using hot glue.  I glued the end of the ribbon to the bottom of my cone, sponged some SU River Rock on it and added my pearl "eggs".  My sentiment is from the same stamp set...I punched it using a SU label punch.  My layout was inspired by the MFTWSC10 sketch:
That's all I have for you today!  Hope you can join us this week and try your hand at a new, or old favorite, technique.  Be sure to swing by the JUGS DT blogs for a healthy dose of inspiration and visit our awesome guest designer, Alyssa Scritchfield.

Wednesday, March 9, 2011

Color Throwdown Challenge #132

Hi friends.  It's hard to believe it's only Wednesday.  It feels like this week has lasted a month already...go figure!  I won't share my woes, but instead will share a very fresh palette of color that our hostess, Broni selected for the Color Throwdown gals today! 
Isn't it gorgeous?!  It's also very similar to the colors I used in my Romance paper pack that I released last month at My Time Made Easy, so it was pretty easy for me to come up with my card :]  The Mojo Monday sketch (MOJO181) influenced my layout, which made my card even easier to whip up! 
I used the Bold Botanicals set from MTME for my bloom, and layered the tulip and some leaves with dimensional tape.  Here's a close up.
I used my new MTME Cornice Trimmed Circle for my main panel, and the Border Builders Elegance Scallop for my scalloped edges.  My sentiment is from the new MTME Keep Strong set.  I layered and adhered my panels and prettied them up with part of a pearl flourish from Zva Creative and some pearl strips from Recollections.
If you play along with us this week, be sure to post a direct link to your project using the Linky Tools widget on the CTD blog.  If you don't have these exact colors, just use whatever you have that comes close :]  Before you get started, check out the beauties our team came up with!  They created some stunners as usual ♥

Saturday, March 5, 2011

MTME & Just Us Girls {Sketch} Challenge

Hi friends!  This is going to be a really quick post because I'm very late getting out the door to the vet.  Blogger was possessed or something last night and I spent the morning fixing the JUGS post and whipping up this one.  So, today I'm hosting a sketch challenge, based on a cute card by Lauren, over at JUGS
For my card I used some old school MTME paper, School Plaid and Basic Blooms.  I love the colors in these...kind of a Dusty Durango.  It's truly Warm Apple Cider from Couture Cardstock, but DD matches beautifully :]  I added the Friend sentiment from one of Lauren's newest stamp sets, Keep Strong.  I love the inspirational phrases in this set.  Perfect for that special someone who needs a lift.  The rest of my card is pretty basic.  I used the Simple Seedling card for my tag (the vellum panel) and added a layered MS butterfly.  I stamped a Fanciful Flourish on the vellum in VersaMark ink and pierced the dotted lines.  The flower is a prima and the ribbon is MS. 
So, whaddya say? Want to play along?! Just post a direct link to your project over at JUGS so that we can check it out. You'll be in the running for Chic of the Week if you post it before 9pm on Thursday next week! Good luck!!

In the meantime, check out the samples our fab team whipped up along with our very talented guest designer this month, Ms. Alyssa Scritchfield!

Thursday, March 3, 2011

My "Bird Lantern" Made Easy

Yep...you read that right, "bird lantern".  This is what my kid has been calling it for the past four days!  LOL  It didn't take long to put together, that was the easy part...I just needed to perfect the modifications I made to the lid with the extra pieces of vellum.  WAIT!  I'm putting the cart before the horse.  Let me start at the beginning.  Today I'm sharing my project using the new Caged template from MTME!  This is a paper birdcage folks...and it's STURDY!  Creating an actual cage and filling it with a nest and eggs is the obvious thought, so I went for a different idea.  I envisioned one of those old fashioned lanterns when I saw the cage assembled, so my wheels started turning. 
I printed one of my new sheets from the Cheerful Chirps collection on vellum, and used it to line the interior of the main piece of the cage, and then went to work on the lid.  That was a bit trickier and I'm certain there's an easier way that I'm not thinking of yet :]  I basically cut the lid panels out of the printed vellum and adhered them so that they would lay between the black "bars".  It left a few empty spots so I cut some extra inividuals pieces by hand from the vellum remaining.  My brad wouldn't hold all of the cs pieces along with the vellum pieces, so I only used it to hold the cs.  I then added a glue dot to each vellum piece as I adhered them to the folded prongs of the brad.  It's not perfect, but it certainly isn't awful and it's totally worth it in the end :]  Check out this shot of my lantern in the dark with my LED flickering candle.  Isn't it pretty?!  I love it!  It totally goes with my decor also so I can USE this in my house! 
You may have noticed that I sponged some copper pigment ink randomly to give the black cs kind of a burnished wood look (if that's the right description).  My dark wood has lighter streaks that pop out...that was the look I was going for.  I added some black sewing trim, a matching double bow with roses, two gun metal butterflies and a coordinating gun metal sentiment frame.  My sentiment is from MTME So Sentimental

That's really all there was to it!  Simple yet stunning project that is usable!  I LOVE how it turned out!  It's so me :]  LOL
Okay, friends.  Be sure to swing by our other gals' blogs for some more inspiration!!


Thanks for stopping by!  I'll be back on Saturday to host the JUGS sketch challenge...if not before then :]