Sunday, August 30, 2009

Thinking of You...TESC80


I whipped up a quick card today for a friend who recently retired. Can you believe I have owned these stamp sets (On My Couch and On My Couch Additions) since I received the shipment I ordered on release night, and today is the first time I have officially used them?! Such a shame! This is such a versatile set, and Lisa Johnson did not disappoint with all of the sentiments (there are a TON if you order both sets) and the "accessory" stamps. What I mean by accessory are the stamps to go along with the couch and chair. I didn't use them on this card, but I definitely plan to in the future! You MUST check out Lisa's blog and PTI for some fantastic examples using these sets. These ladies are so talented!

For this card, I used the Taylored Expressions Sketch Challenge (TESC80) for my layout. All of my supplies other than the pearl rhinestone, the black ink and the dimensionals are Papertrey Ink.

It's hard to see in the photo, but I embossed diagonal lines on my faux "floor" under the chair. I wanted to give the illusion of white wood floors :O) I drew a dark blue line with my Copic to define the separation between the wall and the floor and act as a baseboard of sorts. I stamped the chair with Memento Tuxedo Black on Scarlett In Bloom patterned paper and cut it out. I stamped the pillow using Enchanted Evening ink on Spring Rain In Bloom patterned paper, cut it out and added a pearl rhinestone. Both the chair and the circle panel are popped up using dimensionals.

I kept the bow very simple (so unlike me...) to go with the rest of my card. Oh, and how do you like my simple, one-holed button? At first, I couldn't figure out what to do with the one-holed buttons, but when I added the pearl to the pillow, I thought a little knot on top of the button would kind of match. I like how it turned out :O)

Okay, that's it for now. Thanks for stopping by! Hope you had a wonderful, creative weekend.

Stamps: Papertrey Ink, On My Couch and On My Couch Additions
Paper: Papertrey Ink, Scarlett Jewel, Enchanted Evening, Spring Rain, White, Bitty Box Basics, and In Bloom
Ink: Stampin' Up! Basic Black; Papertrey Ink, Scarlett Jewel, Enchanted Evening and Copic B97; Memento, Tuxedo Black
Accessories: Papertrey Ink, Enchanted Evening Saddle Stitch Ribbon and White Vintage Button; Pearl Rhinestone and Craft Thread from my stash

Saturday, August 29, 2009

Thoughts and Prayers....

Finally I'm back with a project to share! This is not the My Time to Create Challenge that you are used to playing along with every Saturday, the team is taking a break this week to focus on sending the kids back to school. My daughter doesn't go back until September 8th, but she is also 15 and going into her Junior year, so it's not as much work getting her ready as it is for some of my team members who have elementary aged kids :O)
So, I thought I would share the card I made for Mercy's Tuesday Sketch Challenge (MTSC36). If you haven't played along with Mercy's sketches yet, you should really check it out! Something about her sketches have me picturing what to do with them as soon as I see the sketch. Not like some that are ultra confusing and un-inspiring to me.

I started making this card based on this gorgeous K&Co patterned paper that I picked up half price at Michaels. I knew I wanted to stitch the stems of a couple of flowers to the main panel and add a sentiment at the bottom, but I was struggling with which sentiment to add. Then I received a message from my sister that her very close friend's husband died yesterday.

This couple has acted like a second set of parents to my sister, and grandparents to my nephew since he was born. My sister, Kelly, is a single mom and has been since Austin was born 13 years ago. So, the love that Lucy and Craig have shown the two of them was always cherished...they became a part of the family. My nephew even calls them Grandma and Grandpa ♥ It's with a sad heart that I found the sentiment I needed in order to make this a card for dear Lucy.
For the flowers, I stamped the stem in Olive using PTI's Floral Frenzy set and stamped a partial stem for the flower on the left. I then free-handed the punched holes along the stems and stitched them by hand using craft thread. I punched the flowers with a couple of Marvy Uchida daisy punches and adhered them with glue dots. I folded the petals up to give them more dimension and added pearl rhinestones to the centers.
For the background accent panel notice I die cut only the bottom of the panel. You can do this by putting your cs under and over the die. The bottom of the cs went under the die to be cut, and the top came through the die and rested on top of it while I cut. I used the same technique to cut the bottom of the main card.

I just love the elegant lines of this Spellbinders Curved Rectangles die ♥ BTW...7kidscollegefund.com is the cheapest place that I have found these dies. If you find a company that sells for less than 7kids, please let me know! I love a good deal :O)

My Time to Create Back to School Break

Wow! It's hard to believe I haven't posted in almost a week. I know I'm not a daily blogger (though I WISH I could be), but I try to post a few times a week. It's been so busy at work recently I've just felt drained every day and haven't been feeling overly inspired. I do have a couple of projects to share, but I need to photograph and edit and upload. I'll post one of them in the morning and the other on Sunday.

If you're looking for Lauren's My Time to Create Challenge, the team is taking a "Back To School" break this weekend, but we'll be back next Saturday with a fantastic sketch challenge!

Check back after breakfast today and I'll share my take on Mercy's Tuesday Sketch Challenge (MTSC36).

Hope you are able to enjoy a relaxing, craft filled weekend :O)

Sunday, August 23, 2009

Monochromatic Enchanted Evening

I made this card the other day when I realized I missed another friend's birthday! I'm really not doing good with keeping up with birthdays this year...okay, every year is probably more accurate :O)

I colored the flower with the Papertrey Ink Enchanted Evening Copic Trio (B95, B97, and B99) and two of the Copics (R20 and R22) from the Sweet Blush trio. I tried incorporating Sweet Blush into the finished design, but I kept going back to the Enchanted Evening. Hence the monochromatic card! I used Mercy's Tuesday Sketch Challenge (MTSC35) for the layout. I am just LOVING these sketches!!

I used white acrylic paint on the edges of both blue panels and created faux stitching by piercing the paper and connecting the holes with the SU! Signo Gel Pen. Lisa Johnson posted a tutorial on the ribbon treatment I added at the bottom, just a few days ago. It inspired me to use the ruffled ribbon instead of the scalloped cs from the layout.

Oh, and don't let me forget my disclaimer. This is attempt #2 at using Copics! Soooo...I'm still learning :] Haven't ordered that colorless blender yet either. I think I need to get on that!!

Hope you're having a wonderful weekend! I hope to be back tomorrow with a card for the Color Throwdown challenge! Yesterday's shopping trip threw off my craft time :( BUT, we are almost completely prepared for school (we as in, Tia :)

Friday, August 21, 2009

My Timeless Template Challenge...#5

Today is Lauren's My Timeless Template Challenge (MTTC05)!! If you are new to Lauren's challenges, she switches them up each Saturday (e.g. color, inspiration, sketch, template, technique), and the template challenge is extra special. Lauren designs templates for Papertrey Ink and she shows us how to create some AMAZING packaging every month! She is a whiz...

Today's template challenge entails using one of her templates from PTI (retail is $5 with instant download after purchase, OR you can us one of two awesome FREE templates!! Click HERE for my project using the free stocking template). The second part of the challenge is to make something with "Back to School" in mind. Use your imagination...it doesn't have to be apple related :] I steered clear of the apples on purpose (thanks Alicia for putting me back on track :)

I used Lauren's brand new Tucked Away template to create a pretty package for my homemade bookmark! The bookmark can be for teacher or student. In this case, my book mark is for my daughter because she's 15 and has too many teachers to keep up with! LOL The book mark is sooo simple...it took about 3 minutes to make. I used craft thread and beads...nothing else. I doubled the thread and tied a knot next to each bead that I wanted to stay put.

I kept the box relatively clean and simple, yet girly. I used the Sizzix Flower, Daisy die to created my flowers. I cut the perforated lines between the petals and curled them with my finger. I sewed the button through the two flowers and hot glued it to the ribbon I adhered to my box.

I created the sentiment using a rub on from the SU! Love and Happiness set. I also used the SU! Oval All stamp set to create the border of both oval layers. It's hard to see in the photo, but the base layer was stamped using PTI's Background Basics; Text Style in their Fresh Snow Pigment Ink.

This pretty little box houses my bookmark beautifully! After the bookmark is put to use, Tia can use the box to store some of her other treasures :]

Hope you can play along this weekend!! If you do, be sure to use keyword MTTC05 in the online galleries and link your creation on Lauren's blog using Mr. Linky. You don't want to miss what the rest of the team created!!

<---- Check out their blogs using the links in my left sidebar :O)

Have a great weekend! I'm off to finish up school shopping today...but I'll be back tomorrow with another project I finished up. Thanks for stopping by!

Wednesday, August 19, 2009

Okay, so it's not a card...

BUT!!! definitely worth mentioning. Why on earth did my husband find a 3-foot snake skin at the bottom of our deck two nights ago?! He called me out to show me this:

Yes...some serpent (current location UNKNOWN) is slithering around out there, probably under my house, with shiny, fresh skin. Mind you, the stairs are two steps from my back door, and there are only three steps...then the snake skin!!

Eeeeewwww!! Yes, I'm girly...no I don't like snakes...and YES I miss Hawaii! No snakes there (enjoy your non-snake state for me, Jen Tapler). Here's my husband being gross with the tail.

Soooo...needless to say, no walking off the deck after dark and NEVER going under the house EVER! Despite my husband's pleading to help him with a project. Not happening.
I will stick to my craft projects. Which I'm working on, but I've been in slow-mo this week. I did a few things tonight so hopefully I can share a card tomorrow :O) Thanks for stopping by to read about my snake story. Hope your week is going well (and is SNAKE FREE).

Monday, August 17, 2009

Morning Soft and Copics...FINALLY :)

So, I finally started purchasing Copic markers. Yes, yes...I'm getting with the times :O) I have no idea how to use them, other than a couple of tutorials I watched - speaking of which. If you are a Stampin' Up! demonstrator you have to watch Lauren Meader's tutorial! She had me cracking up when I watched her video and she started talking about customers using her SU! markers when she was a demonstrator :O)

Anyway...I know there are cheaper places to buy them (not much though), BUT, when you purchase over $55 at Papertrey Ink, shipping is free, AND they group the markers into shades that complement their signature colors! So, whether you use their colors or not, it's cool knowing the set of three you purchase will work well together. They charge $16 a set or $6 each.

I used the Sweet Blush set for my Morning Glories and the New Leaf set for the leaves. I don't believe the patterned paper is Sweet Blush, but I like how it looks anyway :O) Oh, and after I watched the tutorials, I found that it is imperative to have a colorless blender...which I don't! So, please be gentle :]

I also used Mercy's Tuesday Sketch Challenge (MTSC34) for the layout. It's definitely not to scale, but I like it :O)

That's all I have for you today! I hope to work on some more projects over the next few days. Hope you had a fun, craft-filled weekend!

Supplies
Stamps
: Stampin' Up! Morning Soft
Paper: Papertrey Ink, New Leaf, True Black, White, and Green Tea Leaves Patterned Paper
Ink: Stampin' Up! Black Staz On and White Gel Pen; Copics, R20, R22, R24, YG11, YG13, YG17
Accessories: Papertrey Ink, New Leaf Satin Ribbon

Sunday, August 16, 2009

Color Throwdown Challenge #55

This weekend seems to be filled with color challenges for me :O) Did you see this week's color palette from the Color Throwdown team?! It's awesome!

Here's the card I came up with.

I created my own patterned paper on PTI Kraft using PTI's In Bloom set and their amazing Fresh Snow Pigment Ink! I paper pieced the Scattered Showers umbrella using Bitty Box Basics and In Bloom patterned paper, punched two, tiny flowers from a piece of SU! Crushed Curry DSP and adhered them to the umbrella. I popped the umbrella using dimensionals and tied natural hemp twine around the card in a random fashion.

I really love how the black ribbon looks against the Kraft cs! Especially with the yellow button :) I kept this card simple, but I really like how it turned out!

The layout came from Mercy's Tuesday Sketch Challenge (MTSC34). I'm really enjoying Mercy's sketches! Can you tell? In fact, I have another sample using Mercy's sketch that I'll share tomorrow. That one is NOT to scale like this one is :O) Fair warning. Ha ha

Until then...hope you are enjoying your weekend! We're painting our kitchen (finally...after 2 years :O)

Saturday, August 15, 2009

My time to Color Challenge - MTCC05

Happy Saturday!!! It's that time again for another awesome My Time to Create challenge. This weekend it's a color challenge! Check out these colors that Pam chose and the cute graphic she made!!

I love the spring vibe with this palette. It's so fresh and pretty. I thought of the new Stampin' Up! In Colors as soon as I saw her graphic, even though her choice of hues are a little lighter. I chose to use Lovely Lilac, Melon Mambo, Bermuda Bay and Barely Banana. This is my card:

I used PTI's new Everyday Button Bits set, but instead of using buttons on my balloons, I chose to use DP and a shiny rhinestone brad :) I used different sized hole punches to cut the "balloons" and sponged the edge of one in Melon Mambo and the other in Craft White. I embossed the baskets and the Mellow Moss ground and sponged the background with Soft Sky before adhering the balloons. I stamped the sentiment right on the main image, and added the brad by trimming the prongs with wire cutters and using a small hole punch to cut the right sized dimensional for the back.

I punched a small hole where I wanted my flower and adhered to the embossed and melon cs layer. I added the ribbons and tied a bow using the buttons and craft thread. Everything else seems self explanatory :O)

Be sure to check out what the rest of the team came up with! They are an amazingly talented group of ladies who inspire me constantly!! Links to their blogs are listed in my left sidebar <---

Also, add a link directly to your creation using Mr. Linky on Lauren's blog so that we can check out what you did. If you post in any of the online galleries, be sure to use keyword MTCC05 so that we can look at all of the projects in one place :O)

Can't wait to see what this awesome color palette inspires YOU to do!

Stamps: Papertrey Ink, Everyday Button Bits
Paper: Stampin' Up! Bermuda Bay, Melon Mambo, Barely Banana, Whisper White, and DSP; Papertrey Ink, DSP
Ink: Stampin' Up! Bermuda Bay, Melon Mambo, Mellow Moss, Lovely Lilac, Craft White, and Versa Mark
Accessories: Papertrey Ink, Raspberry Fizz Ribbon and Vintage Buttons; Primas; Michaels, Glitter Brad and Yellow Ribbon

Tuesday, August 11, 2009

Exciting News!!!

First I have to share my story (go figure, right?)... I've been trying to play along with the Color Throwdown challenge (CTD54) since WEDNESDAY last week! If you can't see them in the image above, the colors for the challenge were Basic Gray, Blush Blossom, Pumpkin Pie, and Really Rust.

I don't know what my hang up is, but I truly have one with the color orange (I don't own Pumpkin Pie, so translation in my head = orange). Don't get me wrong, I like and use several variations of orange (rust, coral, etc...), but orange itself, I avoid like the plague!

I tried multiple images (from different companies) I've been wanting to use, switching the colors to see what worked best, tried a clean look, distressed look, several different techniques...you name it, nothing felt right. BUT, after all of my trial and error for almost a full week, I finally figured something out last night....this card:

It's hard to see in the photo, but I stamped the image in Blush Blossom first, then in Really Rust. When I embossed with clear powder and then heat-set it again with Dazzling Diamonds, some of the rust flowers turned orange! COOLNESS...now I had all my colors :O) I also added an orange flower and velvet brad for good measure!! LOL

I knew I wanted a clean background to really make the colors pop, so I went with white and a little Cuttlebug embossing. I sponged the edges of both white panels with gray to give it a little more dimension, yet keep the clean look. Oh...and I didn't take a picture of the inside but it says, "So glad you're in it". Isn't that the cutest gee-whiz sentiment to put on a card for someone you hold near and dear? I just loved it when I read it. Lisa Johnson comes up with some of the most amazing Papertrey Ink sets! I just love her style :O)

I uploaded it to SCS around midnight last night! Yes, I was up late on a work night stamping, but I really wanted to come up with something for this challenge since it was so challenging to me! I was bound and determined to create a card with these colors!! LOL

Fast forward to my exciting news! My card led to my selection as the Featured Stamper this week!! Woohoo!! I couldn't BELIEVE it when I saw my card featured!!!! How awesome is that? Totally, right? I am on cloud 9!

Last but not least, I can't forget to mention my layout. It came from Mercy Kerin's Tuesday Sketch Challenge (MTSC33) last week. I'm trying to catch up now that I've been introduced to her sketches. I just think they're so fun and easy to work with :O) You should really check them out if you haven't already!

Thanks for stopping by and letting me share my exciting news! Supplies for my card are listed in my SCS gallery post. Hope you're having an amazing week!

Saturday, August 8, 2009

My Time to Inspire Challenge...MTTI05

Happy Saturday!!! Today is Lauren's My Time to Create Inspiration Challenge (MTTI05)! I LOVED this inspiration piece as soon as I saw it and had a million ideas that day.

Well, it's a month later and I didn't double check Saturday's inspiration piece until Thursday. I made the card Friday night but I REALLY struggled for some reason! I don't know if my mojo flew south to be with my dad, or whether it's sleeping on the job, but it was so hard for me today :( Where did all those ideas go? Do you ever have stamping days like that? I'm sure I was just tired, and I ended up creating a card I don't hate, so all is good...but it was frustrating there for a while. This is what I came up with...

Sooo...my hope for you is that you find this post at the peek of your creativity, whether it be morning, midnight, or lunch time, and you can whip up a project in no time! The colors are soooo vibrant and fun and the patterns were so happy, it shouldn't be too hard!

I know my colors are a little off, but it was sort of intentional :] I realized on Thursday that my Wednesday card had almost the exact colors from this inspiration piece! Fortunately, it's an inspiration piece and not a color challenge, so I figured there was room to be flexible...and I was :) I tried to incorporate the patterns I liked by using a SU! marker to create criss-crossed lines on the leaves and stem of my plant, and using polka dotted and flowered DSP. I stitched two flowers that I crocheted directly to the panel, and I paper pierced the main and the background panels. I used Papertrey Ink buttons and ribbon, and a Martha Stewart punch to create the butterfly.

Oh, and before I forget. The layout came from a blog I happened across today called, Lord Have Mercy! She seems to be a VERY popular lady so many of you probably already know her...but I don't :( Anywho...apparently she has a sketch challenge every Tuesday called "Mercy's Tuesday Sketch Challenge" (MTSC32). The sketch I was directed to is the one I used for my card even though the post was dated 28 Jul 09.

I'm sooo tired right now, I'm going to update this post tomorrow to list the supplies (I know...lazy). Fortunately, we have a fabulous team of talented designers who undoubtedly created some amazing papercraft eye candy to keep you occupied until then :O) You don't want to miss what these ladies have to share...why not share your thoughts with them when you stop by their blogs?? I'm sure they would love to hear from you!


If you play along, please be sure to link your project using Mr. Linky on Lauren's blog. Oh, and don't forget! Lauren will be posting the Top 5 projects each week in the "My Time to Shine" spotlight with links to each designer's blog! You don't want to miss out! The My Time to Shine team from last week are already listed on her blog!!! Also, don't forget to use keyword MTTI05.

Thanks for checking in! Hope you have a relaxing, craft filled weekend :O)

Wednesday, August 5, 2009

Belated Birthday Wishes...

I realized when I got home from vacation that I totally missed one of my CLOSEST friend's birthdays while I was gone!! In fact, her birthday is one and the same as my nephew I bragged about yesterday. His birthday is going to be my excuse for forgetting my friend, Tiffani's special day :O)

Anywho...while I was supposed to be cleaning my craft room yesterday, I made a card for Tiff (go figure). I used the color palette from the Color Throwdown (CTD53) and the layout (err...skewed result of the layout) from Taylor VanBruggen's sketch challenge (TECC76). This is the end result.

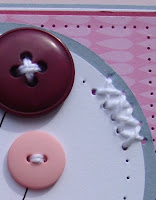
It's hard to see in the photo, but I stitched two random areas of the circular layer with white craft thread. I wanted it to be subtle so I stuck with white :) I added a small pink bow over the stamped bow and sitched the buttons directly to my cardstock. I'm sure everyone has their own style with stitching buttons on, but I find that positioning the buttons first and poking the holes before stitching helps to line the buttons up perfectly and creates a guide to thread on both sides of the cardstock.

I crocheted the flower during the drive to Ohio. My plan was to create tons of crocheted flowers while driving to Ohio and Michigan, but I quickly found that I forgot to bring the flower pattern with me! So, on the first leg of the trip I was left to my own devices. I just started making up my own "flowers". This one really is an over-crocheted circle, that just happened to pleat just right to make it look like a very full flower :O) So, I'm calling it a flower. Yes, I finally wrote down the pattern when I got to Michigan and had a few minutes of internet time, and I created a flower in every color of craft thread I owned on the drive back to Virginia. I'm sure you'll be seeing more crocheted flowers in the future blog posts!

The Color Throwdown has a new challenge today! I haven't even checked it out yet :( I'm off to do that just as soon as I publish this post! Don't forget to stop by again on Saturday for the next My Time to Create challenge! Lauren is starting a new "My Time to Shine" segment on her blog each week. The top 5 participants will be highlighted with links to his/her blogs the following Saturday. If you are selected as a "My Time to Shine" designer, let me tell you...your blog activity will more than double! Lauren has over 10,000 subscribers to hers :O) So, show your stuff and let us recognize your talent! It's an inspiration challenge this week that you don't want to miss!!

Hope to see you Saturday :O) I'm back to work tomorrow...tear :( BUT, a two day work week is alright with me!! Hee hee

Tuesday, August 4, 2009

Vacation Cards...i.e. LIMITED Supplies!!

Okay, so I planned on posting the cards I made while I was on vacation yesterday, but I ended up doing things around the house instead.

So, here goes. Let me explain my situation so that you fully grasp the struggle it was to come up with these meager cards! LOL I was on vacation in Ohio when I made this first card. My husband's family is from Fort Recovery. Never heard of it? Well, that would make sense since it's such a small town in Ohio. Oh, and taking into consideration the size, you can probably imagine the lack of internet connectivity around there. Let's just say we had NONE at his dad's house. Which ended up being just fine. It was actually nice living a simpler life for a few days.

Here's a look at his dad's property (and my lame attempt at creating a panoramic photo). So serene...

Here's a better shot of his dad's gorgeous pond!

This is Carl and his dad sitting on the swing his dad made. Carl is the one not cooperating for the photo :]

Anywho. Carl's aunt owns a scrapbooking store in the "bigger" town nearby. I picked up a few things to make a card for my nephew's birthday when we stopped by. Notably, a stack of patterned paper, a pack of rub on transfers, one foot of ribbon, one button, some glue (to use with my paper quilling), a mini paper piercing tool and three pieces of cardstock. Notice I didn't mention any tools other than the paper piercer and NO INK?! Zippo. What to do?! I'm a gadget girl...everything rests firmly on the tools I have at hand and I can't recall many cards I've made without ink!!

Well, back at the ranch I decided to make this card for Carl's stepmom who left well before I woke up the day we left, which means I didn't have a chance to say goodbye. I sifted through his dad's kitchen drawers and found a few tools to use on her card.

In this picture you're looking at a pair of pinking shears, scissors, a tape measure, and a pack of thumb tacks. I used the thumb tack cardboard to back my panel while I pierced it. Looking at this photo it occured to me that I could have used the thumb tacks as my piercing tool :O) In the end, I think the card is pretty in the simplest way!

I created this next card for my 2-year old nephew, Jaden :] What a sweetie pie he is!! I could just eat him up. This card was mediocre at best considering my tools and limited supplies. Not to mention the glue (vs my normal adhesive) warped the card considerably. I figured it didn't really matter since my active 2-year old nephew would probably demolish it within 10 minutes :O) As you can see I also forgot to mention that I bought some foam adhesive shapes at my husband's aunt's store also. I loved this cute little elephant! My daughter wrote the sentiment for me, and I used the mytimess34 sketch as my layout. I LOVE this sketch and totally plan on using it again for a MUCH better card! LOL

If you haven't had a chance to play along with the challenge, please do! Be sure to link your card using Mr. Linky on Lauren's blog! From now on, Lauren will be highlighting the top five cards on her blog each week! The top five will be known as the "My Time to Shine" group and she will link to each designer's blog. You don't want to miss out! Lauren has over 10,000 subscribers to her blog alone. Let's share your awesome talent with them!

Here's a shot of my cutie patootie nephew opening the ball we bought him :O)

You can't tell in this picture but he has the sweetest blue eyes! I adore this monkey sooo much! And he totally loves his "Aunt Krikky" (my family calls me Krissy). I can't wait to see both of my nephews and my sister again...and we just left on Sunday! LOL Those of you with close familys know what I mean...

Needless to say, neither of these cards will be posted in my galleries! Ha ha. I hope to create something more my style today or tomorrow. I'm REALLY hoping to play along with the Color Throwdown! Did you see the palette this week? Sooooo inspiring and girly :O)

Until then...thanks for checking in! Hope your week is going well. I'm back to work on Thursday :(