Sunday, February 28, 2010

My Time Made Easy - March Release Sneak Peeks :]


Can you believe it's already time for another My Time Made Easy release?!  It has been such a blast working with Lauren designing her paper and some of the cut files as well as being on her DT using the amazing templates and stamps she has released and pairing them with my paper creations!  Oh yes, I'm EXTRA busy, but I LOVE what I'm doing!  Lauren continues to inspire me in so many ways, through her awesome projects that make me say, "WHO thinks of that?!" to her stamps that give me tons of ideas for the new paper each month.  So, since I haven't said it recently, thank you Lauren for such an amazing opportunity!  I'm so proud to be working with you :]  I also need to send a big thank you to the AMAZING MTME design team who makes my paper look spectacular!  I'm swiftly becoming one of the worst commenters I know, but I do look at all of your projects and I LOVE LOVE LOVE everything each of you have made!  I'm humbled to be working along side such talent ♥
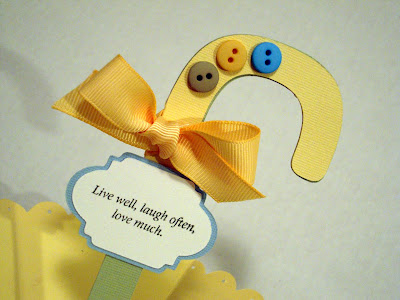
Okay, enough mushy stuff...and onto my template for day 3 of Lauren's March peeks!  Today I was lucky to work with the "It's A Shower" template that will be available at My Time Made Easy on 1 March.  I decided to make my umbrella into a dish of sorts that could be used at a shower to hold chocolates.  Or chocolate covered peanut butter eggs...  If you know me, you know how I LOVE peanut butter ;]  I envisioned a baby shower and thought the eggs were appropriate in a roundabout way :)  LOL 
I kept the sentiment inspirational with the thought that the favor could also serve as a prize for one of the games.  Everyone loves to win the prizes at showers, just imagine their awe at something functional and handmade! 
I used some Pretty Impressions Printables, Bringing Home Baby Boy paper.  The design you see is a sheet of random buttons.  I thought this would be cute not only for babies but also for your every day project/card.  It doesn't HAVE to be "baby-ish" but it works beautifully with that theme :]
One of the neat things about this umbrella is that it comes with an optional scalloped layer.  I chose to use it with my umbrella and also punch holes through each scallop.  Gives it that extra something, I think.  I cut the yellow decorative panels and then sized them about a 1/4 inch smaller in SCAL to cut them again from the button paper.

The tag is one that Lauren herself came up with (along with several others) that are being released as Pretty Pieces cut files on 1 March also.  Isn't it pretty?  It's probably a little more elegant than cute (like my project), but I couldn't resist using it just the same.  It's sooo much easier for me to size a label to my sentiment and cut it with my Cricut than to sort through my punches and dies trying to find one that my sentiment fits.  Even if I do find the right sized punch/die, the design doesn't always go with my project.  So, this method works much better IMHO :]

That's all I have for you today!  Be sure to swing by tomorrow for the release!!!  You don't want to miss it.  Lots of good stuff coming out this month.  Also, check out Lauren and Tracey's blogs to gather a little more inspiration for the release!  Wait until you see what both of them came up with for this template...my jaw literally dropped.  AMAZING...I'm here to tell you!

**Buttons, Ribbon and Ink are from SU!  Colored paper is from Couture Cardstock**

Saturday, February 27, 2010

Just Us Girls Challenge #22

It's time for some Saturday JUGS, my friends :]  Today is the fourth challenge of the month which means template time!  Super talented, Lauren Meader is sponsoring us this month with her Under Cover template from February, along with some cutie patootie cut files that allow you to turn your template into a cute little critter!  Here is the critter I came up with for our challenge:

A puppy made from the bunny file (available March 1st)!  I just left off the bunny tail and decided not to add a puppy tail...though you could easily do that if you wanted to by using the raccoon tail or simply cutting one of your own.  Super simple! 

I used the face that came with the bunny cut file and just cut three extra eyes, colored them pink and used them for eyelids and the tongue.  If you look close you can see where I colored her eyes a light green using my Copics.  I didn't want to add whiskers, so I just used a SU! marker and added a few dots on each side of the nose. 

For the belly, I cut it out using my Cricut, embossed it using the Swiss Dots embossing folder and sponged the edges with pink ink.  I used My Time Made Easy's Pretty Printables paper from December called, That Hit the Spot for my puppy "sweater".

I created a collar simply by threading some teal MS craft seam binding ribbon through some SU! hodgepodge hardware.  I made a tag using one of Tim Holtz' clear tags.  I have some OLD puppy themed rub ons, and one had a pink paw print that I thought would be PERFECT!  I attached it to the collar using a jump ring from my jewelry supplies.  I just love how it turned out. I tilted the head on accident while I was putting this together, and as soon as I did, it reminded me of my sweet little Shih Tzu when I offer her a treat or a walk...she tilts her head as if asking, "really?".  I love that look, it's super cute!  Sooooo, I went with it ;]

Okay, now it's YOUR turn to create/use a template and play along with JUGS!  It can be any template, we just want to see your creativity!  Sooo...be sure to post a link to your project using InLinkz over at JUGS.  Also, use keyword JUGS22 in any online galleries :]  Can't wait to see what you come up with!

Be sure to check out the team's amazing samples also!!  Their links are in my left sidebar. <---   Don't forget our Feb Guest Designer, Chupa!  She has some of the most creative projects I've seen...and today marks her last Saturday with JUGS :[  Thank you Chupa for your amazing contributions to our team this month!  It has been wonderful getting to know you better!  Don't be a stranger :]

Okay, I'm worn out!  It's past my bedtime!!  Have a great weekend!!

Wednesday, February 24, 2010

Color Throwdown Challenge #81


As promised, I'm back with another Color Throwdown Challenge.  #81 to be precise...and I'm your lucky hostess today!  Soo...without further adieu, here's the palette you get to work with this week:

I just LOVE this color combo!!  This is what I came up with for the challenge. 

Okay, so I have to say, I started a card using Mercy Kerin's Tuesday Sketch, BUT, I saw Tammy's card and rethought my design.  I decided to go with the Sweet Sunday Sketch Challenge #57 (SSSC57) instead.  I finished adhering everything and took at look at the blog to see what everyone else came up with...only to find that LeAnne used the same sketch!!  LOL  So much for giving up one to use another in an attempt to vary our layouts :]  Ahhh, well...it truly is a great sketch, so the more the merrier :)

Okay, I have to move along and hit the hay!  If you play along, please be sure to swing by the teams' blogs for some bonus inspiration :]  Don't forget our Feb Guest Designer, Deb Southard.  Today is her last day with the Throwdown :[  We sure will miss her!  She has been a great addition!!

Deb Southard, Feb Guest Designer

Thanks for stopping by!  Hope you're having a fabulous week :]

Saturday, February 20, 2010

Just Us Girls Challenge #21

Soooo...today is Saturday which means it's high time for another challenge with Just Us Girls!!!  JUGS21 is being hosted by sweet, Bon-Jovi LOVIN', Maria.  She chose this unique palette for her color challenge:

...and here is my take on the palette.
Yep...there's a splash of raspberry on the card.  Note the button if you haven't already :]  LOL  I CASEd one of Bar Anders' cards in her SCS gallery.  Translation...my VERY belated entry for the featured stamper challenge that honored Bar while I was in Florida :] 
I made this flower after viewing a quick and simple tutorial on Chat's blog.  Isn' it cool?  I created a cut file to get just the right flower for the technique...I think it hit the nail square on the head!

I stamped the All A Flutter butterfly in SU! Chocolate Chip ink twice, cut them out and colored the wings with Copics.  I layered them on the sentiment panel in an offset pattern to make it almost appear to be fluttering.

Please be sure to swing by our amazing DTs' blogs for some jaw dropping inspiration!  Their links are in my left sidebar <----------  Don't forget our sweet February guest designer, Chupa!!  She has been such a great addition this month :]

Welp...that's about all I have for now.  I'm off to bed in five...Tia has her state high school gymnastics competition tomorrow where she will compete on Vault.  Crossing my fingers and toes as I type.  I really hope it goes well for her tomorrow.  She has been in a rut recently :[ 

*Complete list of supplies can be viewed in my SCS gallery post*

Wednesday, February 17, 2010

Color Throwdown Challenge #80

Welcome back to another Wednesday Color Throwdown challenge!!  This week Danielle is our hostess with the mostess and she chose this awesome color palette:
I first tried coloring an image using these colors, for one, to try and hone my skills, and two, catch on to the trend the CTD girls make look sooooo easy!  BUT, alas...I didn't have the appropriate colored Copics for the challenge and couldn't get my watercoloring with markers to agree with me.  SO, I totally switched gears and went with my style...clean, simple, pretty (at least I think that's my typical style...).  I like this card WAY more than the one I started with!!!  TRUST me, it wasn't pretty!
Okay, so I stole the technique of sponging behind a crocheted flower from a card in the SU Catalog.  I just LOVE how it looks...like a warm glow surrounding the bloom and making it pop...but also complementing the stem color.  I used one of my newest MS punches for the scalloped, embossed border.  Isn't it pretty?  I love that border punch!

For the Sage panel, I printed the Day At Sea Darling Dots paper I designed for MTME on SU! Sage Shadow.  Doesn't it look cool?  Almost as if I stamped it :]  I kept thinking I should show more of the sage panel because it turned out so cool, but I think you get the idea with just viewing the border ;]

Last but not least, I incorporated burgundy (i.e. PTI Scarlet Jewel) with my stamped PTI sentiment and the cs bordering my main white panel.  A little faux stitching and a pretty bow finished it off! 

We would LOVE to have you play along with us this week!!  If you do, remember, you don't have to match the colors exactly, just come as close as you can and make sure they are your main palette (no rainbows, please :).  Post a direct link to your project using InLinkz over at the CTD blog and use keyword CTD80 in any online galleries.  Can't wait to see what you come up with!  Before you get started, swing by the CTD sisters' blogs to check out their amazing works of art ♥ 

Debi Southard ~ Our February Guest Designer
Thanks for stopping by.  I'm off to Tia's regional high school gymnastics meet tomorrow where she has the opportunity to qualify for the state meet.  We would love any spare prayers, well wishes, crossing of fingers, etc. for her :]  LOL  Thank you!

Saturday, February 13, 2010

Just Us Girls Challenge #20

Well, it's about that time again for another Just Us Girls challenge.  Welcome to challenge #20!!  Hard to believe we've only been doing this since October!  We are so thankful to have such a loyal following and are more than happy when newbies make their presence known by playing along :] 

This week sweet and talented Lisa is hosting a technique challenge.  I've never tried this technique before, so it was truly a challenge for me...as I hope it is for you also :] 


So, in true Kristin-style, I tried making it more difficult than it should be...and ended up with mediocre results at best :[  That's okay though!  I finished which is a huge plus considering I still haven't completed Tracey's sketch from last week (sorry Trace).  Here's my take on the challenge.
I embossed the flowers in both pink and white on my two pieces of cardstock.  Notice the off-centered middle line?  Well, that would be me cutting a wavy line with my Creative Memories cutting system.  BUT, the wavy was short lived considering how small my piece of paper was :[  Hopefully you get the idea behind what I was trying to do.
After I cut the wavy center line, I used my Cricut to cut the fancy rectangle in the size I wanted for my main image using a scrap piece of paper.  I then layered my two pieces under the frame that was still temporarily adhered to the mat, removed the "frame", and cut my two pieces into the same decorative rectangle.  I then cut a navy decorative rectangle a 1/4 inch larger and adhered it to my two pieces.
I cut another decorative rectangle from scrap paper 1/4 inch smaller than my main image and used it as a guide to pierce a border.  I distressed my Fluttering-by definition paper, tied my ribbon to it, and adhered it to my distressed A Loving Heart flourishes paper.  I pierced a border using my Tim Holtz ruler and adhered it to my PTI New Leaf card front.
You can barely see it on the flourish paper but I added a white rub-on in the bottom right corner that says "happy day".  Even though it's hard to see, I like how subtle it is :]

Okay, that's all I have for you today!  Please be sure to swing by our awesome design team members' blogs for some additional inspiration!  They never dissapoint ;]
Alicia ~ unable to play along today...she'll be back soon!
Chupa ~ Our February Guest Designer

We would love for you to play along also!  If you do, please post a direct link to your project using InLinkz over on the JUGS blog and use keyword JUGS20 in any online galleries. 

Thanks for stopping by today!  Hope you have a wonderful, LONG weekend like me :O)

Wednesday, February 10, 2010

Color Throwdown Challenge #79

Ahh...happy hump day everyone :)  Your week is almost over...and mine hasn't even begun!  Seriously.  I went to Florida Friday through Monday and came home to the remnants of a blizzard.  The Federal Government has been closed here in the National Capitol Region since Monday.  Fine by me!  I haven't had a snow day since I was a kid in school!!  We stocked up at the store today in preparation for another 6-10 inches tonight and 4-6 inches tomorrow.  The roads are horrendous and less is more when it comes to venturing out. 

So, to make the most of my time this afternoon, I whipped up a card for the Color Throwdown challenge (CTD79) hosted by Bar!  Check out her fabulous color combo!!
I adore this combination :)  Today I chose to FINALLY use the Argyle Amazement set from My Time Made Easy TM LLC.  I was a little unsure at first about what colors and pattern to use with the argyle, but as SOON as I started stamping, I fell in love with this stamp set!  It's AWESOME.  SO many possibilities for a fresh, trendy look.  I can't wait to use it again :]

I paired it with SU's Dreams du Jour sentiment, a 1" MTME Flutters and Flowers butterfly, and some SU Red Riding Hood ribbon.  My layout came from the very talented Mercy Kerin and her Tuesday Sketch Challenge (MTSC60). 

That's all for now.  We sure hope you can play along this week!  If you do, please link your project using the InLinkz widget and use keyword CTD79 in any online galleries.  Remember, you don't have to use these exact colors, but they should be close and the primary palette for your project. 

Be sure to swing by the design team blogs!  They have some BEAUTIES to share and inspire...as usual :]

Deborah Southard - our Feb Guest Designer

Thanks so much for stopping by!  Hope you are having a wonderful, blizzard-free week!!

Tuesday, February 9, 2010

Valentine Elegance

Today is the last day of the team previews (err...POST-views?!) for the My Time Made Easy TM LLC February release!  I decided to use the Love Poem Paper from "A Loving Heart" collection on my Under Cover Pretty Packaging template.  I kept this simple and easy to reproduce because I thought they would make the sweetest little Valentine gifts for my co-workers!  I made my base with heavy duty black cardstock and kept it clean and simple to really make the paper do all the talking (with the embellishments of course).
I simply added some gorgeous May Arts crocheted ribbon, a 3-D flower & brad, and a pretty little tag with just the right sentiment and I was done! 
Oh wait...I was done after I packed it with caramel Hershey Kisses!  YUM ♥  I made the pretty bloom by printing my digi paper on regular bond paper and using a sweet little flower cut file that you may just see again in the near future ;]  I LOVE that I could program my Cricut to cut 10 flowers from my printed paper at just the right size, push one button and done!  Versus cutting 10 squares from my page and using a die cut to cut through a select number of sheets a couple of times.  I followed a tutorial Lauren created a while back to make the flower.  You can view it HERE.
Similarly, I used a pretty label from my Cricut Storybook cartridge that resembles the Top Note die.  The ultra cool thing about having a cut file or cartridge is that you can size the shape to your needs instead of making your images fit the shape!  In this case, I use a small sentiment and heart from the MTME You've Got Mail stamp set and sized my label down to fit it on.  I also made an accent layer with black cs...just cut it a smidge larger.  PERFECT for my project!  I could go on all day about the benefits of a cut file over a die cut.  Don't get me wrong I still love and use dies that I own, but the benefits of cut files seriously outweigh the benefits of dies.  AND they're WAY cheaper!  Again, check out Lauren's awesome comparison on her blog to really grasp what I'm talking about.
Okay, that brings me to a special announcement!!  Lauren is offering a surprise on this last official day of team peeks :]

SUPRISE GIVEAWAY!

Today is the last day of peeks from the February My Time Made Easy ™ LLC Release!  We are offering a chance to receive a $100 Gift Certificate to the My Time Made Easy ™ LLC store.

All you have to do in order to qualify is the following:
  • Visit each design team members blog to view their project.
  • Leave each member a comment about what you liked best about one of their release projects from the week.
The winner will be drawn via www.random.org.

The winning name will be cross checked for comments on all design team members' posts. If the winning person did not complete the round of commenting, another number will be drawn and cross checked.

Winner will be announced Friday February 12th on Lauren's blog!

Okay, so be sure to swing by the team's blogs to leave a little love about your favorite project of theirs for the release week and don't forget Lauren!  Your comment on her blog is basically your entry stating you commented on the team's blogs and that you want to be eligible for her generous giveaway!
* and of course *

Thanks for stopping by and GOOD LUCK!!!

Saturday, February 6, 2010

Sure Cuts A Lot Deal!!!

Okay, for those of you who follow my blog, you have probably read about Canda at www.candacraft.com who offers the Sure Cuts A Lot (SCAL) software that works with Cricut machines to cut out cut files from your computer.  Such as the cut files we sell at My Time Made Easy TM LLC.  These cut files are a HUGE cost savings to you when you take into account the number of punches and die cuts you have bought over time.  Check out Lauren's very thorough explanation HERE for an awesome cost comparison.  Really explains the benefit of using your Cricut with SCAL.

Anywho, just wanted to let you all know that if you have been on the fence and were hesitating because you wanted a deal on the software, now is the time to take the plunge!  Canda already offers SCAL at the lowest prices I've found out there, and now she's offering a 10% discount on your entire order (including sale items) if you use coupon code FEB14.  Okay, so I guess you don't HAVE to buy the SCAL software with the coupon, BUT, if you haven't yet, now is the perfect time :)  The coupon expires at midnight on February 14th.

HUGE thanks to Canda for being so generous

Just Us Girls Challenge #19

Hi all!  It's about that time for another Just Us Girls challenge!  #19 to be exact, which is a cool sketch provided by your sweet hostess, Tracey!  Check it out:

...and my sample.  Oh wait....that would be M.I.A. this week.  Yep, no sample...at all.  I just didn't manage to finish one before heading out to Tia's gymnastics meet in Orlando.  Successfully escaping the blizzard that is taking over the National Capitol Region right now :[  I will do my best to finish one next week when we get home though!  In the meantime, please swing by our amazing design teams' blogs (<--- left sidebar) and our super talented February designer, Chupa!  They are SURE to inspire you :]

Enjoy your weekend ♥ I'll be back on Tuesday with another MTME project and on Wednesday with a fab Color Throwdown project!  Thanks for stopping by!!

Friday, February 5, 2010

My Time Made Easy - Welcome Home

Happy Friday!  Today is my day to share a My Time Made Easy project with you all :)  I couldn't stop thinking about the Welcome Home template, so I decided to focus on it for my day.  I'm soooo feeling girly and longing for spring...I guess that explains all of my girly, and spring-like projects I've been creating recently.  This one is no exception!  I feel like it's both girly and spring-like.  I LOVE how it turned out!  So fresh and fun ♥
I used Couture Cardstock Blushing pink cs for my house and MTME white flourish paper from "A Loving Heart" collection for my roof and lattice/fence.  I think it looks cool in both areas, but especially as the lattice surrounding the house...you can still see some of the flowers and vines from the paper so I decided not to add any more.  Cool, huh? 
Can I interject on my own jibber jabber for a minute?  I just have to say I cannot believe I waited this long to really get into using my Cricut.  The time it is saving me alone has paid for the machine in full.  So, THANK YOU, CANDA!!!  We ♥ you for being so generous and bringing us into the new age of technology!  Okay...back to my jibber jabber...  Look at the detail I avoided having to cut by hand..specifically the windows and the slot on the template.  No measuring, no over or under cutting (or measuring just a little off).  It's perfect every time now...and I couldn't be more pleased at the time it has saved me.
I decided to make curtains for my windows using strips of ribbon and adhering the ribbon to the edge of the window frame.  Also, like I mentioned before, I added a lattice fence to my house using a Martha Stewart punch.  I added ribbon around th ebase as a nice finishing touch and maybe to give the allusiuon of grass ;]  Punched some flowers and added them along the top of the ribbon.  Oh, and check out the door.  Can you see the embossed squares?  My front door at home is designed in a similar way, so when I saw all of the cut squares from the windows, I thought, "Why not dry emboss them with a squishy mat and achieve the same look?!"  Sooooo...that's just what I did!  It worked like a charm...  The only other detail worth mentioning is the cutie patootie birdie!  I colored her with Copics, trimmed to size and adhered with a dimensional.
Inside I added all of the makings for a jewelry maker starter kit.  Look at all of the supplies I fit in there!  I didn't add the jewelry making tools because they were an awkward fit after everything else was inserted, but that just gives me an excuse to make another package for them!  I just might do that next week...we'll see how I"m feeling.  I may move onto something else by then ;]

If you didn't get here by way of Lauren's blog, please go back to visit her and any other team members who happen to have projects today also.  They've been producing some AMAZING projects...you don't want to miss what they have to offer!!

Thanks for stopping by today!  I won't have a project for JUGS tomorrow because this weekend wil be absorbed with Tia's gymnastics meet...but I expect to return on Tuesday with another MTME project and Wednesday for the CTD!

Wednesday, February 3, 2010

Color Throwdown Challenge #78

Happy Wednesday :]  I'm actually typing this late Tuesday night...crossing my fingers and toes and doing a little snow dance in the hope that we have a snow day tomorrow!  They're expecting 3-6 inches, which to us Michiganders is nothing, but around here it seems to be a big deal.  I live in the National Capitol Region.  I'll just say, aggressive driving really has no place on the road after a small blizzard...so a lot of these drivers here won't know what to do with themselves :]  I think it's best that we all just stay home ;]  LOL

Anywho...today I bring you my take on the Color Throwdown palette that our hostess, Broni chose for us:
Starving Artiststamps sponsored the Throwdown this week, and I chose this pretty chaise lounge, pillows and sentiment.  You'll have to forgive my coloring inability...I'm nowhere NEAR the caliber of my CTD sisters who seem to be able to color perfectly in their sleep...but I'm working on it ;]  I used Copics to color the wood frame of the chaise lounge and to ground my image (TAMMY...I promise it IS grounded...but the ink disappeared by the time I took photos! LMBO)  Oh, and yes, yes...my sentiment is a tad crooked...just a tad...so please overlook that little defect ;]
Oh, I almost forgot.  I used the CAS Stamping, FTL75 sketch for my layout.  As you can see, I flipped the sketh horizontally.  I used the SU! slot punch to punch two slots about a quarter of an inch apart, one on top of the other to thread my ribbon through.  Before I pulled it tight, I thread another piece of ribbon through the exposed ribbon on the panel.  I pulled the panel ribbon tight, and adhered to the cs.  Afterward, I tied the extra piece of ribbon already threaded through the front, into a bow.  I paper pieced the cushions on the chaise lounge.
Okay, that's all I have for you today!  We certainly hope you will play along this week.  If you do, please post a link to your project using Mr. Linky on the CTD blog and use keyword CTD78 in any online galleries.  Don't forget to swing by the amazingly talented DTs' blogs!!  You'll surely be inspired if you do :]
Danielle Kennedy
Deborah Southard - Our February Guest Designer

Thanks for stopping by.  Hope to see you back on Friday for another My Time Made Easy project :]  Have a great end to your week :]

Stamps:  Starving Artist
Paper:  SU! Soft Sky and DSP; Cosmo Cricket, Girl Friday and Ever After; Creative Memories DP (from my stash); PTI, Blush, Select White, and Kraft
Ink:  Staz On, Brown; Copics;
Accessories:  Reflections, Pink Pearl Rhinestones; Michaels, Pink Satin Ribbon; SU! Slot Punch; Cuttlebug EF

Tuesday, February 2, 2010

My Time Made Easy February Release...Day 2!

[Note: I'll update links and supplies later today!]

As promised, I'm back with another project for the My Time Made Easy February release!  Today I'm using the Pretty Packaging, You've Got Mail© template.  Lauren designed this template to resemble a USPS box!  Isn't it the cutest?! 
I used Couture Cardstock Silent Night cs as my back and base segments, and their Blushing cs for the front. Quick plug...I just started using Couture Cardstock and I must say I LOVE LOVE LOVE their paper so far!  They have a fabulous variety, and I've taken a special liking to the textured cs...which I'm using here :]  I printed the Flourish design with the navy bg from the MTME, A Loving Heart© collection, cut it (along with the rest of the template) using my Cricut Expression.  THANK YOU CANDA!!!!  She is totally my savior when it comes to cutting out these templates.  The SCAL software she sells married up with my Cricut, makes it soooooo simple to cut the templates.  I don't recall minding very much when I cut them by hand, but now that I've seen the light and the machine is doing it for me, I could NEVER go back!! 
For the front, I used stamps from the Pretty Impressions, You've Got Mail stamp set.  Trimmed, clear embossed the front of both pieces, and layered with 3M dimensionals after I added a navy snap to the top layer.  I used some SU! Hodgepodge Hardware to frame my "slot" on top, and added some sheer ribbon and a crocheted flower to the bottom to keep it prettiful ♥
Now for the part I've been waiting for...check out how much room is inside this thing!!  I poured an entire bag of Hershey Bliss raspberry filled hearts inside and there's room to spare!  Think of everything you could tuck in here...a onesie, socks, a cupcake, a figurine, a nail kit...the list seems endless!!
Here's a shot of the little matching tag I made to go with it.  I have to apologize because I totaly forgot to take a photo of the back, but I stamped "TO:" "FROM" and "With Love" on the reverse side.  All stamps are from the You've Got Mail set.  On the front, I used my pink definition paper from the MTME, Fluttering-by set, a snippet of the flourish paper, and more ribbon.  Can a girl EVER have too much ribbon?!  I think not...
That's all I have for you today, but be sure to swing by on the 5th for another project, and between now and then visit the DT (links in my left sidebar <---)!  Check out Lauren's blog first to see who is releasing on what day after today (we're all sharing a project today).  More importantly, check out the MTME store and everything Lauren has to offer this month!  She's one talented lady, that Lauren

Thanks for stopping by!  I'll also have a card for you tomorrow for the Color Throwdown challenge!  You don't want to miss it ;]