Saturday, February 26, 2011

My 'JUGS' Time Made Easy...Release Day 1!!

Hi friends :]  I'm here today to share not only my JUGS project, but to also introduce you to some of the new (and old) products being released on March 1st at My Time Made Easy (MTME).  Pam challenged us to create an envelope gift box.  You know...a box that will hold those cards we love to pile on the goodies?! 
Seems like ALL of mine have too much stuff to mail in a normal envelope, so this challenge was perfect for me!  Now, there is a tutorial over at SCS that shows you how to make a cute, practical little box...and I believe the rest of our team used it, so plenty of inspiration there...but I chose to use the mini MTME Creative Card Candy template instead (this was released last month and is available immediately)!  This template can be used for so many things, and the cool thing is that this $5 template comes with TWO different sized boxes.  One is elongated so as to hold the same shaped cards, or mini cards and envelopes side by side (or candy as you can see in my post HERE).  The mini box can hold a set of flat cards and envelopes stacked...OR, one card piled on with pretties (such as I've done today). 
So, for my box, I used artichoke cs for the lid, and a pale pink textured cs (Couture Cardstock) for the box.  I lined the inside of my lid with one of my new papers being released on March 1st - Wistful Wonder.  I also decorated the top of my box and my card with two other sheets from the same pack.
I adhered some white, ruffled, decorative trim I picked up in the sewing section at the Hobby lobby and layered some old Rose colored grossgrain SU ribbon.  I stamped one of the new sentiments being released from Lauren's Keep Strong set (oh how we needed a set like this...I LOVE IT) on my Trendy Tags 1 cut file, sponged the edges and adhered it with dimensionals.  I then added my primas and made some trinket pins by taking some sewing pins from my stash and adding some pearls.  I used a very small amount of hot glue that was still warm on the nozzle of my gun...and dabbed a bit on the pin before sliding the last pearl in place.  This held them secure and allowed me to leave space between that last pearl and the flowers below them when I attached the pins. 
For my card, I used my Creative Card/Envelope 1 cut file to cut out my card and the decorative layer.  I then added the same white, ruffled, decorative trim and SU ribbon...only I added a double looped bow on my card (doesn't it look cool?!  Who knew I was stashing a little treasure that makes beautiful double looped bows...I get so caught up with wide ribbon and big bows, I lose sight of what I can do with the old supplies I still have on hand).  As you can see, I also used my Trendy Tags 1 cut file again, just scaled down to fit my card (the label and the design of the cards were created from the same base shape, so they complement each other beautifully!).  I stamped a different sentiment from the same Keep Strong set and adhered with dimensional tape.  I added my prima with hot glue and my card was complete!  I LOVE how it turned out.  My new paper looks really pretty when it's printed...I was actually taken aback :] 
So, I added my bulky card to the box by layering it on top of a simple white doily and tying it closed.  Perfect envelope gift box and I did ZERO cutting!  My Cricut did all the work for me :]  This is going to a friend who will undergo major surgery on Monday...so the timing of this release is perfect!  Also, the cool thing about this particular box, the way I decorated it and the sentiment, is that she can remove the card and use it to store little trinkets or something she treasures ♥
Okay, don't stop here, you have a TON of inspiration to check out this morning!  The queen of craftiness, Lauren has an amazing project to share with you...wait until you see what she did with one of the cut files we released in March last year!  CRAZY ingenuity!   Also, don't forget our other DT members who have projects to share:
Kathryn (our oh-so-talented March Guest Designer!!)

After that (or before :)...check out our JUGS gals and our very talented guest designer, Lori Kalus!  They too, have some incredible inspiration for you today:

Thanks for stopping by!  Have a fantastic weekend!!!

Wednesday, February 23, 2011

Color Throwdown Challenge #130

Today I'm sharing a card using some of the first paper I released with My Time Made Easy!  I don't use it near enough!!  The colors are unique and vibrant...and almost perefectly complement today's Color Throwdown challenge (CTD130) palette that Tammy selected:
The pink is a little darker and there is no saffron, BUT, that's easily rectified!  Add a saffron butterfuly using the Flutters and Flowers cut file!  I also used the Rambling Rose cut file I created last year.  This is one of my most popular cut files...and if you've seen what Lauren has done with this, you'll understand why!  She works magic, I tell ya!  This is my humble attempt to replicate her method (using a wire curler instead of tweezers).  Isn't the dimension fabulous?  The white scalloped panel is another sneak peek at one of my new cut files coming out in March.  Keep an eye out on the new release...starting on the 26th ;]  I layered it on my Killer Curves cut file and also used my Border Builders Elegance Scallop cut file for my two, decorative trims under the tangerine ribbon.  My paper with the script and butterfies came from the Shutter-fly pack and the striped paper came from the Fluttering-by pack.  My sentiment, "Grow Old Without Growing Up" is from the Sensatinal Sentiments set.  I stamped it on my Sentiment Flag die by Lil Inker (aka Laura).  I thought the saying went perfectly with the fun loving paper :]  Could be a birthday card or simply an inspirational card.  Haven't decided yet :]
My layout was inspired by the Mojo179 sketch this week...such a fun design!
Alright...that's all I have for you today, but my CTD sisters have some gorgeous projects for you!  Check em out:

Thanks for stopping by!  Hope you have a short week like I do :] 

Sunday, February 20, 2011

Just Us Girls {Color Challenge} #72

Hi friends...I'm back...and late again with my Just Us Girls card!  I started my card Thursday night, and planned to finish on Friday morning, but I decided to get my hair done instead :]  Friday night I drove my daughter to Richmond to the State Gymnastics competition.  She competed on Saturday in three events and did AWESOME!  She didn't place in the top 8, but I believe she took 9th on vault.  She also had her best floor score for this high school season and tried a new skill on beam.  I'm so proud of her!  Glad she spiced things up at her last high school meet and that she had FUN!!  My very dear friend, Kristin and her husband, Mike drove up for the meet.  I haven't seen them in sooooo long, it was amazing to spend those few hours together. We picked up as if we've never been apart, just like we always do, so that made it even more fun :]

Anywho, onto the challenge that our awesome hostess, Kathryn selected colors for:
This week is also extra special because we have a new JUGS lady with us!!  Sweet, loyal, talented, and super fun, ELISE DURENBERGER has agreed to join what she affectionately calls us, JUG-HEADS!  LOL  She's a hoot!  Please take a minute to stop by her blog and give her a great big, loving, JUGS welcome!! 
Okay, so for my close up photo, I'm sharing my hand-stitched, distressed patterned paper that I used.  Sara came up with this sheet!  Isn't it PRETTY?!  It's from her amazing, vintage, Brassy Botanicals pack!!  The post card is from my Vintage Posts sheet in the Cool Romance and Warm Serenity packs.  I scaled it to 3.5 x 5" in order to get the tiny post card I needed for my layout.  Which btw, was inspired by Teresa's Viva la Verve Week 3 sketch
I attached the post card using one of Tim Holtz Mini Paper Clips and I attached my sentiment to the cork using a head pin (that I trimmed down with wire cutters).  I cut my cork with a Blossom Nestie.  The Jute twine is from May Arts.  I added some white acrylic paint to both layers and then sponged my distressed edges with Tim Holtz Tea Dye Distress Ink.  Pretty simple all things considered :] 

If you haven't already, please swing by the JUGS sisters' blogs to check out the beauties they came up with! 

...and don't forget about our amazing February guest designer, Lori :]

Hope you have an awesome LONG weekend like me :O)

Wednesday, February 16, 2011

Color Throwdown Challenge #129

Hi friends.  I'm sharing a CAS card with you today to showcase Cathy's fabulous, fresh CTD color palette.  Check it out:
I'm one who LOVES layers and pretty embellishments on my cards, but I also like to change things up occasionally. So, that's what I did today when I whipped up this clean and simple card.  I suppose it revolved around the fab Mojo178 sketch that I was determined to use as my layout. 
I didn't want a standard circle or a scalloped circle, because I feel like that's what most people will lean toward. I wanted to do something unexpected, so I punched holes to create my circular shape and then added pearls in between the holes.
My main panel is also simple at first glance, but it was a little more involved.  I stamped the bloom from MTME Bold Botanicals repeatedly and embossed it in white.  I used a light colored Copic to color around the edges to create a shadow and make the blooms more pronounced.  I stamped my sentiment from MTME So Sentimental on my vellum, Trendy Tags 1 in dark green Staz On.  I trimmed the top edge and added a piece of Scor Tape to each side.  I sprinkled SU Dazzling Diamonds on the front to add a little shimmer, added my ribbon strip and bow and finished up my card.

That's all I have for you today, but the CTD gals have some works of art to share with you!  Remember, you don't have to use these exact colors...just come close!  If you upload to an online gallery, be sure to use keyword CTD129 so that we can view your projects in one place.
Thanks for stopping by today  Hope you are having an awesome week!  See you back here on Saturday!! 

Monday, February 14, 2011

My Sweet Valentine

Hi friends!  This is a QUICK post to show you the Valentine I made for my daughter :]  It's also my do-over of last week's Color Throwdown challenge (CTD128).  All of my supplies are listed in my SCS gallery if you're interested.
I used the MOJO178 sketch for my layout.  Check it out:
Okie doke.  That's all I have for you today ;]  I'll be back on Wednesday with another CTD challenge!


Sunday, February 13, 2011

Just Us Girls {Technique} Challenge #71

Hi all.  I'm FINALLY here with my JUGS71 project!  I'm a little behind because, 1 - I procrastinate...which means I put off making my card until Friday evening.  2 - Friday evening my kiddo found out she was accepted to the University of Florida...so naturally we had to celebrate!  I haven't felt that hot all weekend, but I finally mustered the energy to put my project together today!  Those are my excuses, and I'm sticking to them!  LOL  Without further adieu, I would like to present you with our fellow JUGS gal, Andrea's challenge to use the spotlighting technique!  One of my faves!!
I wasn't feeling a card, so I went with a template that believe it or not I have YET to use (until now)!  I've been wanting to use the MTME Tea Tabbed Box for a while, but I just never put it to use.  So, that was my project of choice today.  I stamped the bloom from Bold Botanicals in Bashful Blue around the white part of my box, and used the Framed Elegance cut file to do my spotlighting.  On the oval I stamped the bloom in Early Espresso ink and colored the flower with Copics.  I also stamped my Framed Elegance sentiment in Early Espresso.  The base I added to my box is an EARLY sneak peek of a cut file I created a LONG time ago that we're finally releasing in March :] 
For the top of y box I created a flower using some fabulous satin fabric my dear friend, Broni sent me, and my Beautiful Beech Leaf cut file.  I sponged the veins using the cut out and white craft ink after running the leaves through my crimper repeatedly in different directions to break down the fibers and curl the leaves with my fingers. 
I added some pretty ribbon and a bow pinned down with a brad.  Last but not least, I added my Earl Grey Black Tea that matched beautifully!
Okay, folks...that's all I have for you today.  I'm headed to bed to get some much needed rest before the grind starts again tomorrow.  If you haven't arleady stopped by the JUGS blog to check out our DT's fabulous creations, you'll definitely want to do that!  They rocked this week's challenge!

Have a great week ♥

Wednesday, February 9, 2011

Color Throwdown Challenge #128

Okay I have to say...this week is FLYING by!  That's good, right?!  Bad part is I just can't seem to catch up.  I will though...every peak has a valley...just biding my time for the lull.  So, that brings me to today's Color Throwdown challenge!  Laura selected this pretty palette that is perfect for your Valentine cards! 
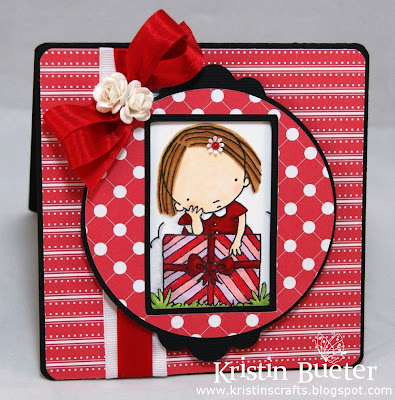
I waited until the last minute to make my card, so I ended up not showcasing the palette like I should have.  Not in love with the final result...and I stepped out of my comfort zone and colored this sweet PI image my friend and CTD sister, Bar sent me.  She is adorable, but my Copic coloring leaves a lot to be desired.  Either way, I think my card will be perfect for a little girl's birthday, so I'll hold onto it :]
I used my December MTME paper Dotted Stripes and recolored it to Real Red for my card.  My decorative circle is my MTME All Tied Up Circle cut file.  I created a "window" in SCAL on both circular layers and differed the size of the two rectangles by 0.2".  I added a punched flower with a flat backed pearl to my sweet PI lady's hair and two primas to my red bow.  Quick and easy...which is good if this ends up in the hands of a youngin' :]  I used the Sweet Sunday sketch (SSSC103) for my layout...I just flipped it on it's side:
Okay, that's all I have for you today!  Be sure to swing by the CTD gals' blogs and give them some love.  THEY are sure to inspire you...I'm thinking I'll have a do-over later this week!  LOL  Don't forget to visit our fab guest designer, Joan Ervin!
Thanks for stopping by today!  Hope your week is flying by as swiftly as mine is :]

Monday, February 7, 2011

PMS VIP Hop!!

I'm so excited to share today's post with you all!  A couple weeks ago, my sweet friend, Tangii, asked me to be her guest for the Paper Makeup Stamps (PMS) VIP blog hop today!  Woot woot!!  I'm certain that I don't qualify as a VIP to anyone out there, but it humbles me that Tangii thinks enough of me to ask me to join along in the fun!  Thank you, Tangii!  OF COURSE I jumped on board.  Not only do I adore Tangii, but I also adore Katie, the Energizer-bunny-owner of PMS!  That girl just keeps going, and going, and going...I don't know where she gets her energy!  Here's a little snippet about the blog hop from our PMS gals:

Paper Makeup Stamps is turning 2 years old! And to celebrate the occasion, they are having a super fun VIP blog hop with the theme "the things we love". The entire design team invited special crafters to play along in this hop. To see everyone involved, please go back to the Paper Makeup Stamps company blog for a master list as well as to enter your self to win a super fabulous prize!


Okay, even though the hop's theme is "the things we love", that doesn't mean we have to use hearts and Valentine stuff, just something we love.  I LOVE the water...especially the Great Lakes.  I grew up on Lake Huron and loved going to the beach in the summer, swimming out to the third sandbar that was well over our heads, and trying to sink down and touch the bottom.  We also spent time on the lake in the winter...which I actually dreaded because it meant FROZEN toes!  My dad loved to ice fish, and occasionally he would drag us along :]  LOL  I loved spending time with him, BUT, I hated sitting still and freezing my butt off!  Wait, this is about what I love...shoot, I'm going in the wrong direction.  Seriously, I DO love the water.  I love watching the sailboats coast by with seagulls soaring overhead.  I also love lighthouses.  They're all different, all special and unique in their own right...and if you've been to Michigan, you know we have a slew of lighthouses along the coastline.  Last but not least, I love a challenge...and I am challenged when it comes to making masculine cards! 

So, when I looked through all of the amazing goodies PMS has to offer, I chose to work with this amazing, Sailing By digital stamp set.  It has a ton of sentiments and not one, but two different sailboats, a lighthouse and the fill and outline of an anchor!  PERFECT masculine set...and versatile.  SOLD!  Check it out:
For my card, I paper pieced Sara's awesome Custom Construction Materials brick paper on my lighthouse.  I then colored the white areas and shaded with Copics.  I also paper pieced the sails on my boat...using my new MTME Romance paper (scaling both sheets to 3.5"x5").  My "land" is also some of my MTME paper, from the symbolic Seawater set. 
I cut my sentiment (scaled to 1.5" wide) using my friend, Laura's, Lil Inker Sentiment Flag die.  I LOVE this die for my sentiments...I swear I could use it on almost every card :]  I tied some random knots in my May Arts Jute Twine, adhered with hot glue and adhered my panel to my scalloped layer.  Overall a pretty simple card.  Most of my time making it was overthinking what I wanted to do with each element :]  I used last week's Mojo Sketch (MOJO176) for my layout (it was PERFECT):
Okay, that's all I have for you today, BUT, be sure to swing by every blog along the hop and leave some love!  One random commentor will receive a PMS PRIZE PACK!!

Hopefully you arrived at my blog by way of Tangii's...but if not, start at the beginning to make sure you are eligible for the prize pack!  If you're looking for the next blog along the hop, you're looking to swing by Lauren's site :] 

Thanks for stopping by today!  Have a fantastic week!!

Saturday, February 5, 2011

My Time at Just Us Girls...Made Easy ~ Part II

Hi all.  I am back to share deets about the second card I made for the Just Us Girls challenge (JUGS70) today and also the grand finale of the February My Time Made Easy release!  This card uses the same Warm Serenity digital paper pack, but offers a completely different look!  I used the same JUGS sketch that Dana whipped up:

Funny story about the black lace I used.  I was at work one day and a co-worker was wearing a slip under her skirt that had a lace trim that was coming undone (you see where this is headed, right?).  So, she finally yanked the lace trim off with one tug and threw it in the trash...in FRONT OF ME!  I was like, Ahh!  Can I have that lace?!  She looked at me like I was a loony toon but agreed.  I have had it stashed with my ribbon scraps for about a year and a half...and I FINALLY put it to use!  Isn't it pretty?!  LOL 

I layered my sentiment panel and added a partial doily rosette with a pretty, vintage prima on top.  I distressed most of my cs with Tim Holtz Tea Dye Distress Ink before assembling and layering everything on a piece of One Sheet Wonder.  Then I called it a day!I also used the Black Rhinestone Swirls from our very generous Want 2 Scrap sponsor (I can't find it in their store to provide the link, so maybe they're sold out...BUT, this flourish is the same design as their Silver Rhinestone Swirls...you could color the stones with a black permanent marker or a Copic).  Isn't it a lovely accent on this card?  I trimmed off a small flourish on the right side to better fit it to my card how I wanted.  I stamped my sentiment from the new MTME Framed Elegance set, distressed it and set it aside.  I printed the pink striped paper from my MTME Serenity pack scaled to 5x7 on vellum cs and cut my MTME Framed Elegance label from it.  I layered the sentiment with dimensional tape on top.

Okay friends...that's all I have for you today!  Be sure to swing by the rest of the DT's blogs and check out their goodies!
Lori Kalus ~ Guest Designer

...and don't forget about our fab MTME gals!

Naomi ~ Our February Guest Designer

Thanks for stopping by!  Hope you have a wonderful weekend ♥

My Time at Just Us Girls...Made Easy

Hello my friends.  I'm back for the final February release post with My Time Made Easy...and I'm also here to showcase some awesome goodies generously donated by Want 2 Scrap to the Just Us Girls team!  Best of both worlds, I'd say ;]  So...first things first.  The JUGS challenge.  The ever so sweet and talented Ms. Dana is our lovely hostess at Just Us Girls today and she hooked us up by securing a sponsorship from Want 2 Scrap!  Woot woot!  Check out the unique, yet AMAZING sketch Dana came up with:
Awesome, right?!  I was so inspired not only by the sketch but to use some of the new My Time Made Easy goodies, and the Want 2 Scrap baubles we received!  Want 2 Scrap has an EXCELLENT collection of chipboard cut outs.  I couldn't WAIT to get my hands on the flourishes (Chipboard Embellishments - Style D).  My original intent was to paint them and decoupage some of my patterned paper on top, BUT, after I took a second look at the intricate swirls, nooks and crannys, I chose to just paint and pretty it up.  So, I painted my flourishes with burgundy acrylic paint and let it dry overnight (acrylic dries pretty fast, I just happened to paint mine before bed :).  I then stamped one of the small flourishes from MTME Fanciful Flourishes with VersaMark and embossed it with Stampendous iridescent embossing powder.  It's very subtle, yet noticeable.  I thought is was a bit shiny for my vintage style card, so I sponged some Very Vanilla craft ink over the top.  Notice that I took two of the flourishes, flipped one so that they mirrored each other and formed a heart of sorts.  I hot glued the two areas that are overlaid, and decorated from there. 
I printed the Vintage Posts and Damask - Cherry Sand from Warm Serenity at 5x7" each.  I cut out the damask with the MTME Steno Note cut file, distressed and sponged and adhere to my distressed parchment panel.  I added a dinky rosette to my heart flourishes...this is a very early sneak peek of what's to come at MTME ;]  I have to play with my files before I sell them!  LOL I cut out two of my mini postcards and distressed them before tucking them into my flourish heart.  I also added some May Arts lace ribbon that I sponged with the Tim Holtz Tea Dye Distress Ink I used on all of my other distressing :]  I stamped the So Very Thankful sentiment from the MTME Framed Elegance set being released this month, using Memento Tuxedo Black on the bottom right corner of my Steno Note panel.  I embossed the word "Thankful" with clear embossing powder to make it stand out.
Okay, since I've written WAY more thatn I should for one card, much less half of what I need for two, I'm going to close.  I will post about my other pretty card later today, so swing back by around lunch for the close ups ;]  In the meantime, check out Just Us Girls' inspiration for this week!  You won't be disappointed :]
Lori Kalus ~ Guest Designer

Also, check out the MTME team and their goods!!  Fabulous, motivational, inspirational projects...just for YOU! 

Lauren has everyone linked...I'm having issues with our Linky tool, but I'll update as soon as it's fixed :]

Thanks for stopping by today!  I hope you are inspired to give our sketch a try.  Have a fab weekend ♥  I'll be back later with deets for my other card!