Friday, October 29, 2010

My Time Made Easy ~ Perfect Peeks Day 1

Today starts the November My Time Made Easy release peeks!  I'm proud to say I have a project to share this month :] 

I created several cut files for this release along with my usual digi paper packs.  Today my project focuses on one of the cut files, a new template and some OLD paper that just so happens to be FREE!  The template I used was Lauren's new Star of the Show (available 1 November).  I have SO many ideas for this template, I'm ecstatic that Lauren came out with a star box!  Not only can you use these around the holidays, but think of the possibilities if you have kids in sports.  "All-Stars"...hmm...some cute gift ideas come to mind!  Oh, and let me just tell you that this box is so quick and easy to put together, I couldn't believe how fast it was.  So, one of my ideas as soon as Lauren told me about the star box was to make it into a 3-D snowflake...and I did!  Here it is:
I kept the main box and lid simple...just cut the template using plain cs and put it together.  It was the top that I wanted to make fancy :O)  I printed a few sheets of my FREE 12 Days of Snowflakes paper after altering the color just slightly in my image editing program.  I printed the paper on both sides to give it a more finished look from any angle (note the rosettes and the star that hang over the edges).  Exit printer, and enter SCAL & Cricut Expression...where I cut my template panels and my new cut file, the Rosey Posey Rosettes (available 1 November)! 
The rosette cut file comes in two designs - scalloped and pointed.  For the svg version of the file, we didn't add tic marks where you need to score or fold because it was much quicker not only for the machine to cut the file out without them, but the tick marks didn't aid in folding along the lines (I ended up scoring anyway), so I really didn't see the rationale for waiting on the machine.  In the end, we left them clean for all you Cricut users.  The scallops are measured at 1/4 inch intervals, which makes quickly scoring the rosette a breeze which subsequently makes fan-folding go much quicker! 

I will put together a mini tutorial for the rosettes, but in the meantime, google paper rosette tutorial and you'll find several posted instructions on how to put these together :]  Basically, after you score each valley between the scallops/points, you adhere the two ends together giving you a tube shape.  Cut out a circle of cs (approximately an inch or more), use either a glue gun or very strong (and a LOT of) glue dots, and push the non-scalloped end of the tube, inward and down toward the circle.  Adhere the center of the rosette to the circle you punched out.  Adhere another circle to the top of the rosette for added strength.  Decorate as you wish.  I kept mine pretty simple with a punched circle and a pearl.  WDYT?!  Aren't they gorgeous with the snowflake paper??  I love em :]
I adhered them on top of each star 'point' after I adhered the base decorative star panel that I sponged with white, acrylic paint.  I then offset the second star decorative panel and glued white pom poms to each tip.  The center of my box top seemed plain so I used a white, paper doiley, cut out the center, fan-folded and adhered to the box and the big button to create a less structured form of a rosette.  I love the dainty look it brings to my 3-D snowflake :] 

I wanted my snowflake to hang from a wall or a door, so I punched holes on the top point and threaded ribbon through.  If you're wondering how I kept the lid on, it was pretty snug, so I didn't have to adhere it or create a latch or anything.  Pretty cool, ehh?  I think so :]

That's really all I have to share with you today, but be sure to swing by the following MTME DT blogs for a LOT more inspiration!! 


Until tomorrow...have a GREAT Friday! 

Wednesday, October 27, 2010

Color Throwdown Challenge #116

Today's post has to be quick!  I have a ton to finish this week and I'm running out of time due to a bunch of teenager activities that automatically commit mom :]  I know some of you can definitely relate!

You don't want to miss the colors LeAnne chose for you this week at the Color Throwdown!  Such a pretty combination...very easy to work with.  Check it out:
I chose to use my new Verve set, Believe.  I bought this set to support breast cancer awareness and in honor of my mother, Lori Pulda who is also a breast cancer survivor!  I printed my MTME patterned paper (Seawater and Neopolitan), adhered it to some SU! Very Vanilla cs, and hand-stitched the borders of each panel.  I added some pretty green and cream ribbon I bought recently, and layered my bloom on top. 
I created the 3-D flower by stamping the different sizes in white craft ink on Riding Hood Red, cutting out four different layers, and adhering them with dimensionals.  I added a pearl to give it a pretty finishing touch.
 
I used the MTME Killer Curves cut file I designed for my sentiment panel (it also works BEAUTIFULLY with Jen Del Muro's SFYTT this past weekend). 
So, being a cut file, you might think...awwh, I can't sponge the inside of the border because there's no die to leave the paper in.  Well...think again!  I cut an extra circle the same size as the one on my main panel and also layered (centered - vertically and horizontally) another circle approximately 1/4 inch smaller than the large circle in SCAL and cut them out using my Cricut.  I held the "frame" in place on top of my sentiment panel while I sponged Tim Holtz Antique Linen Distress Ink inside the round border.  Cool, ehh? 

Okay, that's all I have for you today.  Thanks for stopping by...don't forget to swing by the very talented DT's blogs!  You won't want to miss their works of art :]
Carla Suto - Our October Guest Designer

Have a great remainder of your week :]


Saturday, October 23, 2010

Just Us Girls Challenge #56

TGIF my friends!  Seriously...I'm so glad it's the weekend despite the long to-do list I have in my head :]  Before I start my to-do list, why don't we get this weekend started with some JUGS?!  Okay, so now that I have all the guys' attention, let's be real :]  It's week 4 of the month at Just Us Girls, which means a 3-D/template challenge.  Pam is our hostess with the mostess, and Lauren Meader from My Time Made Easy is our generous sponsor this week!  She provided the In Suspense template for the challenge. 
I decided to make mine completely different than the obvious intent of the template (door hanger).  I sliced the back piece just below the door handle opening and rounded my corners to make a stand alone, apple box!  I created my "apple" by first printing some of my Darling Dots paper that I'm releasing this month (to add to my previous collections --> November sneak peek 1).  I printed the Cherry onto SU! Cherry Cobbler cs because I wanted my dots to be subtle, but noticeable.  I then ran the cs through my Cricut Expression to cut out the front of my apple box...err, MTME In Suspense template. 
The "window" is pre-loaded onto the front of the template, centered and ready to cut, so no guessing or aligning until it's just right.  I cut the back of my apple box, using just the SU! Cherry Cobbler cs.  I created my stem using a new MTME cut file I created called Trendy Tags 6 --> November sneak peek 2.  The leaves are from another MTME cut file I created called Perfect Poinsettia --> November sneak peek 3 (while its true these are from a poinsettia cut file, I wanted to show how versatile the pretty leaves can be...I could use them on almost ANY flower, I swear!). I printed some of my MTME Fresh Fabric - Collection 2 paper to cut my leaves from.  The pretty tag is yes, another MTME cut file I created called Trendy Tags 1 -- November sneak peek 4, with a simple "Thanks" sentiment from MTME Grab a Cup Sentiments. The official MTME sneak peeks start on 29 October, so keep an eye out!  We have some CA-UUUUTE stuff to show you this month!  So fun :]
Okay, back to my apple box.  I added some Archer Farms Black and White trail mix to sort of resemble the white pulp of the apple and the brown seeds...not uniform in any way, but hopefully you get the idea :]  OOOOHHH...check out my crinkled ribbon (I don't know the real name of it)...my sweet friend, LeAnne MADE this and sent it to me with some other goodies!  Isn't it perfect?!  To top it off, she told me how I could make my own!  Yay...I'm THAT girl.  I see something cool and I want to know how to do it myself!  I cannot wait to give it a shot :O)
Of course, this would be perfect for any teacher as a door hanger also (especially teacher-to-teacher or even student-to-teacher surprise gifts at school), but I wanted to display the versatility of the template.  Hope this inspires an idea for you to play along with our template challenge this week!  I can't wait to see what you come up with :O)  Please swing by our fab JUGS DT's blogs (left sidebar) and also visit Ms. Selma Stevenson our fantastic October Guest Designer! 

Don't forget to leave a direct link to your post over at the JUGS blog and also use keyword JUGS56 in any online galleries.

Thanks for checking in today!  Have a fantastic weekend ♥

Wednesday, October 20, 2010

Color Throwdown #115

It's about that time to throwdown a new batch of color!  This week Laura is hosting and she selected a very unique, versatile combo :]  Check it out!
I'm sad to say I was in a funk when I put this card together, which is a BUMMER because this is the Verve set (Beautiful You) I won from my MOJO card that was selected last week during the contest!  Can you believe Julee already packaged it up and sent it out even though she was headed out of town?  Awesome!  GREAT customer service ;]  Big thank you again to Julee for the lovely stamp set.  I promise to do it more justice in the future when I have a fresh mind. 
As you can see I made the most use of Perfect Plum and only added a shadow of So Saffron on the petals, and Dusty Durango for the center of the flower (watercolored with markers).  I also used my craft knife to cut parts of each large petal to make it pop up from the cs.  I gently curled it inward with my thumb, then bent the edge of each petal backwards with my fore finger.  Just to give it a little more dimension.  I masked the flower and stamped a light background to make a pattern...leaving my brightly colored flower to steal the show. 
I love the sentiments in this set!  I used the top line of one of the sentiments for my card.  I have every intention of giving this to my daughter...maybe when she heads to college next year, maybe for her next cheer competition!  Who knows :]  It reminds me of the song, I Hope You Dance by Leanne Womack.  I gave her the CD and book for that song when she was too little to understand why I gave it to her.  She's 16 now, and knows that the lyrics of that song are my heartfelt wishes for her.  She is SUCH a free spirit...the sentiment is kind of ironic, because she DOES dance as if no one were watching...anytime, anywhere!  LOL

My layout is from the MOJO Monday sketch (MOJO161).
The ric rac is a cut file from MTME - Random Ribbons.  I added a bead from my jewelry making supplies as my "tag" using purple craft thread to attach it to the May Arts ribbon. 

Okay, if you want to play along, please add a direct link to your project using InLinkz over at the CTD blog, and use keyword CTD115 in any online galleries.  If you don't have the exact colors listed above, please just use something close :]

Check out our awesome DT's projects!  They definitely weren't in a funk :O)  LOL

Carla ~ October Guest Designer

Thanks for stopping by! 

Saturday, October 16, 2010

Just Us Girls Challenge #55

Ahh...the weekend is finally here :]  It's Saturday which means that Just Us Girls are challenging you again.  This week Miss Alicia is hosting and selected a FABULOUS color combo!  Check it out:
I waited until 7 pm on Friday to start my card because my mojo was taking a nap or something.  I finally got up, printed some of my MTME paper (Flutters and Flowers and Fresh Fabric - Collection 1), and got to work.  I did what I usually do to preserve cardstock and printed the two sheets of digi paper on one piece of cs (5x7 each).  It scales the pattern which is cool on some of the larger prints and works out beautifully for cards. 
I stamped my flourish from MTME Fanciful Flourishes and my blooms from Sensational Stems in VersaMark ink on my text cs and embossed with clear embossing powder.  I then sponged white craft ink over and around my embossed image to create a soft glow (emboss resist), and wiped the residue off of the embossed areas with a tissue.  Here's a "before" shot of what my image looked like before I layered vellum on top:
I stamped my sentiment from MTME So Sentimental on the vellum and then layered it on the main image.  I used regular adhesive under the black, fancy border and used glue dots under each button to hold the vellum down.  I adhered my Fresh Fabric paper to the black layer I punched the scalloped border on and hand stitched the top and bottom edges.  I added some MS Craft Seam Binding that matched beautifuly, double looped my bow, and finished it off with a pretty prima.  After I adhered all the layers I added two black pearls and I was done.  It really didn't take that long considering I used a stamping technique AND I hand stitched...so I was pleased that I finally got up and worked on it :]
I used this week's Mojo sketch (MOJO160) for my layout:
Now, be SURE to check out our JUGS DT projects!  They are STUNNING! 

Maria
Selma ~ October Guest Designer
Pam This color combo is so attractive...I can't wait to see what you all do with it ;]  Be sure to add a direct link to your post over at the JUGS blog and use keyword JUGS55 in any online galleries.

Hope you have a fantastic weekend!!!  It's cooling off here in VA, which is so refreshing!  I'm ready for sweater weather :]


Wednesday, October 13, 2010

Color Throwdown #114

Happy Wednesday :]  It's time for another Color Throwdown challenge (CTD114) and I'm your hostess today!  I selected a fun palette for you to work with that can used in so many ways:
This is what I came up with:
I used one of my new collections of paper from the October My Time Made Easy release - Coffee Beans...it was also my inspiration for today's colors!  I saw a photo online a couple of months ago that had this combination and I fell in love!  The pretty contrast is right up my alley! 

I chose to use Jen Del Muro's SFYTT from Saturday for my layout:
I took a little liberty with my heart layer and created a tea bag tag that hangs over the edge of my mug.  I stamped the word "Tea" on my acrylic tag, stamped a daisy in white Staz On behind it, painted it with yellow acrylic paint (from the back) and added a brown, punched daisy to make it more visible.   I chose to have my mug just make an appearance on the main panel vs showing the full cup :]  I added a spoon to my cup and also stamped a flourish for my steam.  All of the patterned paper is from the same, MTME Coffee Beans collection.
Okay, so be sure to check out our awesome DT's projects as well as our Guest Designer, Carla Suto's SCS gallery!  If you play along, please add a direct link to your post using InLinkz on the CTD blog and use keyword CTD114 in any online galleries.

Carla Suto ~ October Guest Designer

Thanks for stopping by!  Have a fantastic Wednesday :O)

Stamps:  MTME, Fancy A Cuppa and Fancy A Cuppa Add-On Images
Paper:  MTME, Coffee Beans; SU, Chocolate Chip; Georgia Pacific, White
Ink:  Memento, London Fog and Tuxedo Black; SU, Chocolate Chip, Poppy Parade, Pear Pizazz and Timber Staz On
Accessories:  Tim Holtz, Acrylic Tags; Craft Thread

Saturday, October 9, 2010

Just Us Girls Challenge #54

Whew...it's Saturday already!  Hellloooo three day weekend :]  I'm all about it!  Let's start it off with a fun, EASY challenge from Just Us Girls!  Before I go into the challenge deets and my post, I'd like to extend a very warm, and a very HAPPY BIRTHDAY to my dear friend, Alicia!  Her birthday was Wednesday so we're all surprising her today with birthday cards!!!  I hope you had a fantastic birthday with your family and friends, girlie!  I only wish I could have celebrated with you.  Keep an eye out for your card...I'll stick it in the mail tomorrow :]
Okay, onto the technique challenge that's being hosted by the lovely, Lisa!  She chose to challenge us with using acetate on our projects.  I love incorporating acetate, whether creating your entire project from it, or just adding a little smidge as a focal point.  I really should do it more often.  Today, I decided to just add a focal point using one of the labels from the MTME Killer Curves cut file.  I stamped the flower from the Killer Curves stamp set in white Staz On, and used Pebbles Pearlescent Chalks to color it.  I stamped and embossed the sentiment from MTME So Sentimental in white on the base Cherry Cobbler (SU) panel.  I added some white specs on the flowers using a Signo Gel Pen, and added some flat backed pearls to the acetate (and hid my adhesive under them :). 
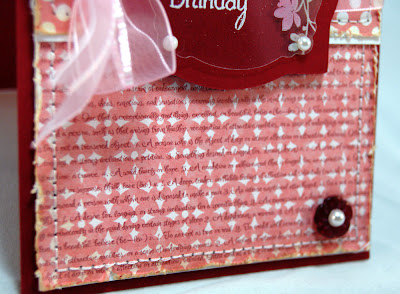
 I layered two of my MTME digi papers (Berry Burst and Fluttering-by) in my image editing program to create the base layer with the diamonds and the text on the bottom two-thirds...and then printed it. 
I also scaled one of my polka dot Shutter-fly sheets to print at 5x7 and created the panel behind the Killer Curves cut file layers.  I distressed the edges of both pieces, sponged Tim Holtz Antique Linen Distress Ink, and hand-stitched them to a white layer.  I added some May Arts ribbon, a flower button with a pearl, and popped up my panels on dimensionals to finish :] 
We certainly hope you can play along with us this weekend!  Check out the rest of the team's beautiful creations by using the links in my left sidebar...don't forget our sweet October Guest Designer, Selma...and I hope you save Alicia for last and leave her lots of birthday love ♥  I would love to flood her comments section with birthday wishes!!

Thanks so much for stopping by!  Hope you have a LONG 3-day weekend like me ;]

Thursday, October 7, 2010

Grab A Cup...of Tea!

Okay, so I actually have a project to share on an "off" day...vs a post for one of my teams!  This is totally out of character for me, I know, but, I just had to share my tea cup using Lauren's MTME Grab A Cup template.  I LOVE the cup and the idea behind it.  This went together in a snap...and it makes a big statement!  Look closely at mine and you'll see how simple I kept it, though it doesn't necessarily LOOK simple.  You know? 
I stamped the Killer Curves flowers on the inside rim of the cup (like the cups you see in fancy gift shops), and printed some of my MTME Cherry On Top paper for the decorative panels to match the stamped flowers.
I created a tag using the Grab A Cup Sentiments, curled the bottom of my handle, added some satin ribbon and a scalloped base, and I was essentially done!  So easy!!  My Tazo black tea and Mulling Spice packets just so happened to match beautifully. 
That's all I have for you today.  Hope you enjoy ;]  See you on Saturday...if not before!!


Wednesday, October 6, 2010

Color Throwdown Challenge #113

Hi all!  It's Wednesday which means it's about that time to throwdown some color with CTD113.  Check out the palette that Danielle chose this week:
Awesome, right?  So is the fact that our teammate, Laura Pryor, is sponsoring the CTD this week!  Yes, Laura!!  She created her very first stamp set, Sentiment Flags, with a coordinating flag die, and we are the lucky recipients who get to showcase them to all of you!  First, a snapshot of her set:
Here's my card using her stamps and die and a new MTME set, A Lil' Cafe:
 The MTME set was designed to coordinate with Lauren's Shop Around Mega Template, but I wanted to show how it can be used on cards as well!  Isn't this cute?!  I have to say, I did some masking with the vase, cup, and table :]  LOL  I just wanted to portray a table that could seat two, yet was only set up for one.  Thinking this kind of went along with the "Get Well Soon" sentiment...as if to say, I'm drinking coffee without you :[  Not too much of a stretch, is it?
I colored the cup, vase and hearts with my SU markers (I know, no shading :)...ha ha.  I used my gray Copic to shade and fill in my debossed lines on the "wall"...and sponged my floor.  I colored the flower in the vase using my SU markers, huffing, and then pressing to the cs.
The patterned paper is one of my MTME designs from the School Plaid - Collection 2.  I added some ribbon, Early Espresso cs, primas, and some buttons.  I also loosely followed the Mojo Monday sketch (MOJO159) for my layout.  Not much more to it than that! 
We sure hope you can play along this week!  You will be in the running to win one of Laura's stamp sets with the coordinating die if you do!!  Be sure to post a direct link to your project on the CTD blog and use keyword CTD113 in any online galleries. 

You don't want to miss the awesome projects our team came up with!!

Carla Suto - October Guest Designer

Thanks for stopping by today!  Hope you are all having a fantastic week!