Sunday, May 31, 2009

Stampin Out Alzheimers - Mojo Sketch 88

Wow...it's Sunday already! Unfortunately, I didn't have the house all to myself for the entire day yesterday nor did I have any mojo :( I must have lost it Friday night after I made this card for the Stampin Out Alzheimers Mojo Monday sketch. Hopefully I find it again tonight or tomorrow so I can finish up some projects I'm working on!

Mojo Monday had their normal sketch challenge this week, but if you upload your card to the SOA site, you have a chance to win some Verve stamps! HURRY and get on the site if you want a chance to win and pick up some freebies (digital stamps, templates, and paper), because today is the last day of the event!! You can gain access to the site by simply donating $5 to the cause. Trust me when I tell you the freebies alone are worth over $5! There are a ton of challenges also that give you additional chances to win prizes! Just use the PayPal widget in my right sidebar --->For my card, I used PTI's new Bird Watching and Bird Watching Additions sets, Stampin' Up! DSP and CS (except for the white which is PTI), PTI button, Marvy Uchida flower punches, and Michaels white twill ribbon.

For the cute little sign, I was inspired by one of the stamps in the set that had a faux wood sign and a cute sentiment in it. There is also a faux wire stamp to "hang" the sign. My sentiment wouldn't fit in the stamp provided, so I made my own. I had some decorative edge scissors that were perfect for the sign...I love that they aren't evenly jagged. I used some of my jewelry wire to "hang" my sign on the card. I attached a brad through the wire loop but I didn't want to punch through my one layer of CS (to keep the inside of the card clean), so I trimmed the edges of the brad so they wouldn't show and adhered with a glue dot.
I first stamped the bird in gray on the main panel. I stamped it in blue on a separate piece of CS, cut it out, and adhered with dimensionals. The heart on the bird image didn't really go with my theme, so I covered it with some punched flowers. I am in LOVE with this color combo! I think it's soooo fresh and summery :O)
Hope you can play along in some of the challenges if you haven't already! This is such a great cause!

Have a wonderful, LOOOOONG Sunday!

Saturday, May 30, 2009

My Time To Create Technique Challenge #1

Today is the 5th Saturday of the month so Lauren has an awesome technique challenge for you! The challenge is embossed vellum cardstock! The guidelines were to stamp on vellum cardstock, turn it over and dry emboss open areas from the back. Then color with markers. Gives a nice pop!
I do believe I did the technique wrong so my apologies, BUT, when I first made a card using this awesome Morning Glory flower, I wanted white petals!! I couldn't think of a good way to make them white, so I settled for coral at the time (you can view the card I'm referring to HERE). Anyway, I decided I wanted to use the same stamp for this technique challenge. When I embossed the petals and saw how pretty they looked in white, I decided not to color them. I did color the stamens though, so I guess that qualifies :O) I decided against embossing the leaves because I wanted the main flowers to really stand out...and they do in real life!

How about this GORGEOUS, satin, lime ribbon?! I LOVE it!! Walmart special :O) Oh, and speaking of the lime color...I used 4 different colors of green on this card. Two on the leaves (Garden Green and Green Galore), one on the CS (Old Olive), and then there's the delish ribbon (lime). Pretty cool how they all seem to coordinate, ehh?

I think the important thing here is to explore your creative ability...starting with this technique. There are so many possibilities embossing vellum! Be sure to link your project to Mr. Linky on Lauren's blog and use keyword MTTCT01 in the online galleries if you're able to play along! I LOVE checking out your work!! You all are an inspiration to me, that's for sure!

Check out the design team's sneak peeks! Intriguing, huh?
Want to see more? Visit the team members' blogs to see these inspirational projects plus some (not all the girls were able to play along this week, but their other work is SURE to get the creative juices flowing)!!


Hope you have a wonderful, slow, relaxing weekend :) I hope to be stamping up a storm tomorrow! I get the house to myself for most of the day and night! Woohoo!!!

**Supplies are listed in my SCS gallery.

Friday, May 29, 2009

Sneak Peek for Saturday's Technique Challenge!

Here's my sneak peek for tomorrow's My Time To Create Technique Challenge! This was such a fun technique! You don't want to miss playing along :O)

I'll post my project at midnight tonight if you're a late-night stamper! Have a great weekend.

Monday, May 25, 2009

My Time to Stamp Out Alzheimers - Challenge!

Today sparked the beginning of the Stampin Out Alzheimers event! You can join and be a part of this fabulous community with a chance to win thousands of dollars in prizes and download a BUNCH of cool FREE stuff, with a minimum $5.00 donation (use the PayPal widget in my right sidebar) ------>

Let me just say that ONE of the free downloads is worth $5 by itself and I downloaded a LOT more than one thing today :O) Totally worth it!!! PROMISE! This is such a worthy cause...whether someone you know has been affected by this debilitating disease or not. I for one hope to never know anyone affected...and if I can help in a tiny way to bring about a BIG change, I'm happy to do it!

I'm co-hosting a 3-D Timeless Template challenge with fellow My Time to Create DT member, Tamara. Be sure to join the forum to see what the challenge is all about :O)

~ Here is my sample for our challenge ~

Front

Back

Tag
Inside

If you can't tell from the pics, I created this gift to hold different seed packets on each side that show through the oval windows on the pockets. The inside holds carefully folded gardening gloves, secured with a ribbon. I thought this made the cutest, SIMPLEST, inexpensive gift ($4.97 gloves, six $0.99 seed packets...and the $5 Take Along Tote Timeless Template...that I can use OVER and OVER and OVER again...PRICELESS)! I can't wait to give it away!! I was going for clean and simple and I think I achieved that today so I'm proud of myself :O)

My color palette came from Dawn McVey's Raspberry Suite, Color Challenge #7. I loved the fresh color scheme and couldn't get it out of my head, so I went with it!
So, with that, please make a small donation and hop on over to the Stampin Out Alzheimers site to play along! There are a ton of challenges and prizes each day! You don't want to miss it!

Sunday, May 24, 2009

Two Challenges and a Birthday :O)

I made this card for a co-worker whose birthday is today! I needed one in a pinch (kind of...I only had the morning to work on it) and the Color Throwdown challenge (CTD43) and Jen DelMuro's SFYTT were a perfect combo to produce this card in the limited time I had. It fell into place pretty easily it seemed (which is RARE for me)...so I was pleased it worked out :) I have to say I'm extra proud of myself for decorating the inside of this card. You can see the corner I decorated with punched flowers in this photo. I love the look when the inside is decorated but rarely do I take the time to do it. I need to stop being lazy :O) LOL
Oh, and my photos are HORRENDOUS! I didn't realize how bad they were until I uploaded to SCS yesterday. Thank goodness I had a few minutes to go outside and take another shot that turned out a little clearer. My apologies for the blurry pics...I hate it when that happens and I can't get my camera to focus just right. I really need to take classes on simple photography. Sometimes it turns out perfectly the first time and others I just can't seem to capture appropriately. I need to figure out what everything means on my simple Canon Digital Elph. Once I learn each function I think I'll know what to increase and decrease to obtain clear photos each time. UGH...I would rather someone sit here and show me while explaining though. I'm a quick, visual learner if I can take the wheel right away and give it a spin. Know what I mean??

Anywho...that's it for tonight. We just had a nice afternoon with some close friends we haven't seen in a while, so we're winding down here. Hope you have a long weekend like me and are spending time relaxing with loved ones.

Saturday, May 23, 2009

My Time to Create Challenge...MTCC02


I LOVE Lauren's My Time to Color Challenge this weekend (MTCC02)! The colors are soooo fresh :O) I just bought this stamp from My Favorite Things...it's my first one from their company. I loved coloring it! There are so many possible color combinations. I used markers and an aqua painter on watercolor paper.

The layout is actually from one of her sketch challenges a short while ago that I didn't try out (mytimess27). I thought it was perfect for this image! Speaking of Lauren's past sketch challenges...I compiled all of them in one album (from the first one she labeled for the online galleries). I also started albums for the new challenges...you can check them out using the links in my left sidebar.

I share this to encourage you to explore your creativity not only from today's color challenge, but maybe also from some of the past challenges! There is no time limit...you can participate anytime :O)

Check out the Design Team's sneak peeks:
Be sure to swing by their blogs to see their creations! I can't wait to see what they've come up with.

Hope you can play along! Be sure to link your creation on Lauren's blog under the Mr. Linky application so that we can admire your work :O)
Have a SAFE, relaxing, Memorial Day weekend.

Thursday, May 21, 2009

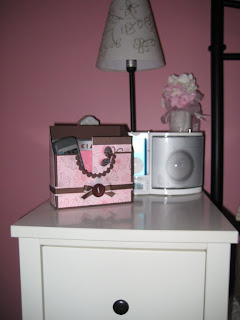
From the {Bedside Table} of Tia :O)

LOL :] This is actually Lauren Meader's PTI "From the Desk Of" timeless template. I decided this would be the perfect bedside table media container. It holds my daughter, Tia's radio/CD player remote, three of her current favorite CDs, and a cute little matching notepad. My colors were inspired by my daughter's room. I have to share the story because it's soooo sweet :O)

She and I took a 4-day trip to Florida in February this year for a gymnastics competition. While we were gone, my sweet husband went to work (day and night) on her room. He bought two colors of pink paint...a lighter color pink and a darker hue called "Raspberry Lemonade" (for an accent wall). He painted her entire room and the closet...bought new bedding, hung up some beautiful, contrasting, double-panel curtains (sheer white and dark brown), framed and hung up an additional shelf and a portrait of me and her when she was just three years old :) He put the whole room back together and purged a lot of excess "stuff" she had accumulated...all resulting in a gorgeous teenage girl's bedroom!

I LOVE LOVE LOVE the pinks and brown together! I think they're just GORGEOUS! Especially with the white contrasting furniture and sheers. This is the room I always dreamed of as a little girl. I'm glad my daughter is living comfortably in it and can enjoy it for a few more years before heading off to college.
For my media container, I wanted three pockets instead of two, so I created a divider for the front pocket. It took two tries but worked out well enough. I stamped the Pink Pirouette CS with a Fifth Avenue Floral stamp using Chocolate Chip and Regal Rose, and I stamped the flower on Regal Rose CS with White Craft ink. I used my Nestabilities to cut the scalloped circle. The pink ribbon is Pink Pirouette from SU! and the brown is Topnotch Twill Dark Chocolate from PTI. The white flower and the button are also from PTI...the Dark Chocolate Vintage Buttons collection.
This was pretty easy to put together after I stamped everything (and figured out the divider)! I LOVE how it turned out and it's such a great match for my daughter's bedroom. I created the notepad using white bond paper that I simply cut to the same size and bound using a couple of staples inside the cover. the butterfly is a Sizzix die cut.
Hope you're inspired to give Lauren's templates a try (if you haven't already). Remember, they offer two free templates on PTI! Be careful though...you might end up wanting all of the $5 templates also (I know someone like that :O)

Be sure to stop by tomorrow to check out the DT's samples for the color challenge!! **Update: Here's a sneek peek of my project for tomorrow's challenge :O)

Have a great day.

Saturday, May 16, 2009

My Timeless Template Challenge #2!


Good morning! I'm so excited to share my template challenge this week :O) I couldn't get Lauren's awesome templates out of my head for the past two weeks! Probably because of the challenge, but seriously, I drew sketches and took notes on the three templates I'm showing today while I was sitting at work. Mind you, I should have been looking over our money or contracts, but I was sketching on scrap paper! I took those sketches home and this is what I created:

Flower Pen Holder
Paper Clip Dispenser

Notepad File Box

I created this set for a friend at work who has a birthday coming up :O) Both the Flower Pen Holder and the Paper Clip Dispenser use the "For Keepsake" template. I printed the template scaled to "multiple pages per sheet" at 2 per page with a horizontal configuration for my
Paper Clip Dispenser. This shrunk the template to approximately a third of the normal size.

While I was sitting at work thinking of these baskets I wanted to make, certain Longaberger baskets on my desk were my inspiration (for the pen and paper clip containers). I thought I could easily figure out how to make a paper clip dispenser based on the design of the Longaberger Paper Clip Basket. Wouldn't you know, I came home tonight and finally put it together...and my "vision" worked like a charm!!
After I made the lid, I cut some pink foam paper about a quarter of an inch smaller than the inside of the lid. I didn't want it touching the sides so the lid would still fit the right way. I took three squares that I cut to the same size and cut a hole in the center of each (same size as the hole in the lid). I adhered the squares together with Crystal Effects and set them aside to dry. Once dry, I trimmed a piece of magnet to fit just inside the hole of the foam and lid. It was a little "taller" than the hole, so before I adhered it, I trimmed the magnet lengthwise to fit. Peeled the backing and adhered in the hole. I used Crystal Effects to adhere to the inside of the lid because I feel like it's a stronger bond and it seemed to be doing a good job of holding the foam together :O)


I have another Longaberger basket on my desk that holds my gerbera daisy pens :O) I don't recall the name of the basket, but it's shaped like a jar and kind of tapers at the top. I think it was the Blue Ribbon Basket or something like that. Anyway, the Flower Pen Basket I created is definitely not shaped like my Longaberger basket, but I really thought I could make the template work for flower pens. I only cut a window on one side thinking that the basket would most likely be pushed against the cubicle wall, but in hindsight, I would probably cut another window to make it easier to see the gem rocks and my cute, purple butterfly on the window :O) It was really hard trying to get a good photo of it.

I feel like anyone who likes to craft has made flower pens I kept the lids on my pens because I don't want them marking up the inside of my holder. Another option would be to line the inside with acetate. Then if the pens marked it, you could wipe it off.

For the inside panels of both For Keepsake baskets, I stamped white polka dots (PTI Polka Dot Basics) on Pretty in Pink cardstock. I also did this for the middle divider of my "From the Desk Of" template. I used some remaining flowers from my bunches to accessorize my templates.


Originally I was planning on laying the Notepad File Box on it's back to make it look like an in/outbox (mini) but I liked it so much when I stood it up, I left it alone. I wanted a cute way for my friend to display her notepads on her desk and thought this design was perfect! You'll notice I didn't modify the notepads we use at work to match the basket. This was on purpose to show what it will truly look like at work. We go through these things pretty quickly. Didn't this one turn out cute? I really did like it when all was said and done! I hope my friend isn't reading my blog this week... If she is, I guess it won't be a surprise :)

I really hope you get to play along today! The My Timeless Templates were soooo easy to use!! They're listed for $5 on Papertrey Ink, but they also have two free templates that you can use. Both of them are adorable! Part of the challenge of using a template today was to create a birthday gift and use the color purple or a butterfly.

If you upload to an online gallery, be sure to use the keyword MTTC02 (no space). I can't wait to see what you come up with!!
Be sure to check out the My Time to Create Design Team's projects also! The sneak peeks are intriguing :O)

My Time To Create Design Team:

Okay, that's all I have for now! Be sure to post your creations to Mr. Linky on Lauren's blog so we can check out your projects! Have a great weekend :O)

Saturday, May 9, 2009

My Time to Inspire Challenge #1

Well, we're off to a good start with Lauren Meader's new challenge line up! This is her first My Time to Inspire Challenge (MTTI01) for us.

I decided to make a mother's day card since one of the colors is purple - which is my mother's FAVORITE (yes, all caps FAVORITE) color!

I've been wanting to use this rose stamp from Fifth Avenue Floral for a while now, and I really liked the Mojo Monday sketch this week (MOJO85) so I forced it to work :O) LOL

I stamped the rose with Black Staz On ink and used watercolor pencils and an aqua painter to color it. I stamped the smaller roses on the brown panel using acrylic
paint...easy way to make the colors stand out on the dark cardstock. As I was putting the layout together, I decided the rose needed something more to finish those panels off. It took a while before I decided to use the opening from the border punch on the left panel to pierce the design in each corner surrounding the rose. I was a little more satisfied with it after that :O)

So, my problem is that tomorrow is Mother's Day and the horrible daughter that I am this year, has NOT sent this card! OMG...shame on me. I did send her flowers earlier this week with a notecard so she isn' totally without. BUT, I really wish I had gotten my stuff together and posted this on time :( She deserves to receive it on time, that's for sure.

My mother is one of the strongest people I know. She has had MANY trials in her life that she has overcome or persevered through. She always made sure us kids had what we needed when growing up and she loved u
s unconditionally - and made that known at all times. She taught me to be strong and independent, and that the most important thing a family can have is love. Good, bad, indifferent...we will always love each other unconditionally. So, thank you, Mom, for molding me into who I am today and for teaching me so many valuable lessons in life. I love you - always ♥ Happy Mother's Day!!

Here's a sneak peek at the design team's creations:

Everything looks so pretty! I can't wait to hop over to their blogs :O) Hope you do the same! When you stop by Lisa's blog, be sure to read her post. She used a digi stamp on her card that has a very special purpose. All of the proceeds from the "A Fairy for Kayleigh" digital stamp will go to this special little girl who is very sick, and her family. You can read about their struggle here. I'll be buying this one in a few minutes!

Don't forget to check out the rest of the DT! I'm getting ready to hop by now ;O)


Hope you're inspired by Lauren's awesome challenge and find some time to play along! If you do, be sure to use keyword MTTI01 in the online galleries. Can't wait to see what you come up with!!

Have a great weekend. And if you are a mother, Happy Mother's Day!